Sunday, March 31, 2019

Big Mar's Antipasto

Every year for the holidays, my friends and I gift each other with homemade treats. Suzanne bakes amazing cookies and sweets, I make jam and granola and my friend Marie presents us with jars of homemade antipasto. Normally when I think of antipasto, I think of thin slices of cured meats and aged cheeses served with brined vegetables and crusty bread. Marie's antipasto is based on a classic Calabrese recipe of olives, pickles, lightly pickled vegetables and canned tuna suspended in a tomatoey sauce and served on crackers or toast. The first time my husband and I opened one of Marie's jars of antipasto, it disappeared in about 30 minutes.

Marie got this recipe from her Italian American mother, Mary Polino, otherwise known as Big Mar. Big Mar is a 97 year old firecracker and she looms large in the lives of Marie and her four siblings. Last year, Marie invited the bitchin in the kitchen gals over to Big Mar's house to make a swinging batch of antipasto, but Big Mar took a bit of a tumble and we had to postpone. At 97, she was no longer able to stay in her two-story home and after her release from the hospital, she moved to an independent living facility just a few miles from Marie's home. Luckily, there's a well equipped activity room with a full kitchen, so on a chilly Saturday afternoon I met Marie and Big Mar at The Residence of Whitehall to make this unusual and delicious dish.

BIG MAR'S ANTIPASTO

3 cans small black olives
3 10 oz jars of small green olives, the ones with pimentos
2 quarts small sour pickles, cut into bite sized chunks
2 large carrots, sliced thinly
3 stalks of celery, sliced thinly
1 large cauliflower, cut into bite sized florets
2 bags frozen pearl onions
2 lbs button mushrooms, cut into chunks
6 cans good quality tuna packed in oil
2 20 oz bottles of ketchup
2 quarts tomato juice
salt & pepper to taste
1 cup olive oil
2 quarts water
2 cups white vinegar

Now, this recipe makes a crap ton of antipasto. I brought a dozen wide mouth pint jars, Marie had another dozen standing by and we expected to fill them all. Feel free to cut the proportions if you don't have the patience for mass antipasto production. In preparation for the task ahead, Marie had cut all the veggies into bite sized pieces and by the time I arrived, she and Big Mar were in the activity room getting things ready. There was a large pot with  water and vinegar on the stove over medium heat. Each veg has to be cooked separately because they all cook at different rates. I started opening cans of olives, draining them and dumping them into a large roasting pan while Marie cooked the vegetables one by one in the lightly simmering brine, starting with the carrots and ending with the mushrooms.

Each veggie cooked for 8 to 10 minutes, some more or less, until they were slightly soft and had taken on the vinegar flavor. Marie and Big Mar tasted each veggie to make sure they were cooked properly and we reserved the pickling liquid to thin the sauce if we needed to. We added all the ingredients to the pan, saving the tuna for last, and once everyone was in the pool we mixed gently with our hands. I kind of like the tuna to remain a little chunky, but the antipasto should be mixed well and the the sauce should be liquid enough to just cover everything. If its too thin, add enough of the vinegar brine to cover the veggies.

According to the recipe, the antipasto should sit at room temperature for five hours before its jarred, but we didn't have that kind of time. However, it was St. Patrick's Day weekend and the folks at the Residence at Whitehall had some snacks, entertainment and adult beverages for their residents. We went down to the dining room to discover Pittsburgh mainstay Mikey Dee and his drummer playing all kinds of fun singalongs and telling bad jokes. We had so much fun, Marie and I, enjoying mudslides and silliness with Big Mar and her neighbors.

An hour later we were back in the kitchen getting jars and lids ready. As we ladled antipasto into jars, Big Mar wiped the tops and put the lids on and when we were done there were 22 glorious jars of pickled veggie heaven waiting to be processed. The last jar was only half full and that was the one I opened when I got back home that evening. Jason and I enjoyed our antipasto on a toasted baguette and it was perfect with a little lemon squeezed over the top.

My own 95 year old dad had a fall last year as well and he relocated a couple months ago from Texas up to Pittsburgh to a facility just three miles from my house. Marie and I are going through the same experiences with our aging parents and we both recognize how important it is to spend quality time with them while we can. It was an honor to spend the day cooking with Marie and getting to know her lovely, hilarious mom and every time I eat this tasty treat, I will think of Big Mar.


Saturday, January 26, 2019

Cookies Cookies Cookies

In preparation for the holidays last year, our little Bitchen' in the Kitchen group got together at Suzanne's house to bake cookies. This group of women doesn't do anything half-assed, which is part of why we love cooking together. When we made pizza, we made 6 different varieties. When we made pierogies, we made 300 of them. In true Bitchin' in the Kitchen style, this cookie showdown was bound to be one of epic proportion. Its been difficult to get our original group together and  Suzanne, Lynn and I were the only ones available for cookie-palooza. We needed an infusion of fresh talent, so Suzanne called in reinforcements and we welcomed Kathy and Danette to our group.

Suzanne and I both picked two cookie recipes we wanted to try. Lynn and Danette each chose one, but Kathy couldn't stay long and brought cookies instead of making them at Suzanne's. We had six recipes to tackle, which meant our planning, coordination and equipment were all critical parts of this big undertaking. Since oven space would be at a premium, Lynn decided to whip up a batch of pizzelles which is an Italian holiday tradition that is made in an iron, much like waffles. Danette chose rugelach with two different fillings - chocolate and apricot jam. Suzanne made spicy lebkuchen dough before everyone arrived, but her plan was to have the group roll it out and cut it into fun holiday shapes before baking. She also picked a family favorite of hers, oatmeal squares with date filling. I found two recipes that sounded intriguing - brown butter blondies and cinnamon pinwheels.

We all brought our specific ingredients and some equipment, but Suzanne set up a staging area with all the flour, sugar and basic baking ingredients we needed. We had two dough stations, each with a stand mixer, and a separate area with a food processor for chopping nuts and dates. Lynn's pizzelle iron was on the far side of the kitchen and she made her batter first so she could just park herself in front of the iron and crank out delicate pizzelles. The kitchen table was set up with a big silicon pastry mat for rolling. We all got in there, donned our aprons and got to work. While Lynn made her pizzelle batter and I got my blondie batter going, Suzanne and Danette rolled out the lebkuchen dough and cut it into gingerbread man shapes. The teamwork was remarkable as we all pitched in to help each other with our recipes. Danette helped Lynn make pizzelles, Suzanne helped me roll out my pinwheel dough, I helped Danette make her rugelach, it was just a fun day of making cookies with a bunch of wonderful women. Suzanne even had a bunch of plastic container so we could take lots of cookies home with us.

Both of my recipes were lovely, although when we packed up our cookies to take home, I was missing samples of both of mine. So I made them again, just to make sure they were as good as I remembered.

BROWN BUTTER BLONDIES

2 1/4 cups all purpose flour
1 tsp salt
1/2 tsp baking powder
12 tbsp unsalted butter (1 1/2 sticks)
1 3/4 cup light brown sugar, packed
1/2 cup corn syrup
3 large eggs
2 tbsp vanilla
1 cup toasted pecans, chopped
1/2 cup chocolate chips
Flaky salt for sprinkling on top

There are many things I love about this recipe. It doesn't require any special equipment, you don't need a stand mixer or even a hand mixer to make them because the batter is all mixed by hand and they are rock star delicious. The flavor is deep and rich, more like candy than cookies, with toffee notes and a salty pop. Because of the corn syrup, these blondies have a chewy, toothsome and very satisfying texture. This recipe does come with a couple challenges, but it is worth the effort.

First, get all your stuff ready. Set your oven to 350 degrees and make sure the rack is in the center of the oven. Line a 9x13 baking dish with aluminum foil to create a sling. Spray the foil liberally with nonstick cooking spray. These blondies are very sticky, so this will allow you to remove them from the pan with ease. When they are baked, you just lift the sides of the foil and pull the whole thing out, then let them cool before peeling the foil off the back. Easy peasy.

The major challenge in this recipe is browning the butter. Browned butter is the key to the rich, nutty flavor in this recipe. Put your butter in a small saucepan over medium heat. While its melting, you don't need to watch it too closely, but as the butter begins to bubble, you will need to keep an eye on it and swirl the pot to keep it moving.  As the butter cooks, the milk solids begin to turn brown, which gives it that wonderful nutty flavor. I suggest using a white spoon or spatula to stir the butter, which will help you see the milk solids as they brown. It does take time for this process to unfold, but it can go from perfectly browned to burned in a matter of seconds, so once it starts bubbling, don't walk away from it. While the butter is browning, measure your dry ingredients into a small bowl and your brown sugar into a large mixing bowl.

The butter should have a deep golden brown color when its done. Once the butter is nicely browned, pour it into the bowl with the brown sugar and whisk to combine. This mixture may look a little separated, but don't worry about it. You want to whisk it until it cools down enough to add the eggs. If you add the eggs while the mixture is still too warm, they would scramble. The butter and sugar should be just barely warm to the touch when you add the eggs. Whisk the eggs in until its all combined, then add the corn syrup and vanilla. Now, this recipe calls for a whopping 2 tablespoons of vanilla and the flavor is very forward in the final bake. This is not the time to skimp on the cheap stuff. Get good quality vanilla for this recipe and I promise its worth the extra money. Add the dry ingredients and just stir them in until they are incorporated. Don't over mix! Finally, fold in the nuts and chocolate and pour the batter into the foil lined pan. Bake it for about 40 minutes, rotating the pan half way through. You can use the toothpick test to make sure its cooked through.

Let the pan sit out on the counter for about 30 minutes, then lift the foil sling out of the pan while the blondies are still warm. Its going to be difficult, but its best to wait for at least 90 minutes before cutting into these beauties. They're very sticky when they're hot. Cut them into squares and take bets on how long they will last. They are addictive.


CINNAMON PINWHEELS

2 1/2 cups all purpose flour
3/4 cup sugar
1/4 tsp salt
16 tbsp (2 sticks) of unsalted butter, softened
2 tbsp cream cheese, softened
2 tbsp cold water
1 tsp vanilla
3 tbsp sugar
1 tbsp cinnamon

These cookies are as delicious as they are beautiful. This recipe is a little more involved than the blondie recipe, but its not too difficult and the results are impressive. Put the flour, sugar and salt in the bowl of the stand mixer and, using the paddle attachment, just give it a couple spins to combine. With the mixer running, start adding the butter one small piece at a time until it forms a crumbly dough. Add the cream cheese, vanilla and 1 tbsp of cold water and mix until it just begins to form a ball. If the dough is still crumbly, add a little more cold water, but just enough to bring the dough together. Turn the dough out on your work surface and bring it together into a solid mass. Divide the dough in half and wrap each half in plastic wrap, pressing it into a somewhat flat disc.

This dough needs to spend about half an hour in the fridge. If you tried to roll it out at this point, it would just turn to mush. While the dough is chilling, mix 3 tbsp of sugar with 1 tbsp of good quality cinnamon together and set it aside. When the dough has chilled, its ready to be rolled. Fortunately, parchment paper makes the whole thing a snap. Put a sheet of parchment paper on your work surface and place one of the discs of dough in the center, then put another piece of parchment over it and roll the dough between the parchment until its about 1/4 of an inch thick. Try to keep your dough as close to a rectangle as possible. Peel off the top piece of parchment and sprinkle the sheet of dough with half of the cinnamon sugar leaving about 1/2 an inch of a border, then spray just a bit of cold water over the sugar just to make sure it all sticks. Now its time to roll.

Working with the long side of the dough, gently flip the edge over and start making a jelly roll, peeling the parchment away as you roll. Try to make your roll tight and compact. When you get to the end, roll the whole thing in the parchment, crimp the ends and place it gently in the fridge. Follow the same directions with the second piece of dough. The rolls need to sit in the fridge for at least two hours before baking. When you're ready to bake, set the oven to 350 degrees and take the rolls out of the fridge. Unroll them and gently slice the rolls into 1/8 inch slices. If the pinwheels begin to unroll, just press them back in place. Put them on a cookie sheet and bake them for about 8 minutes, just until they begin to brown around the edges. Remove the immediately from the cookie sheet and let them cool on a rack before serving. These cookies are delicate, crispy and buttery with a ton of cinnamon flavor. They also look beautiful on a cookie tray. And if you decide not to bake all of them, the dough will keep perfectly for a few months in the freezer.

Our cookie extravaganza was a lot of fun and we all came home with several dozen tasty little treats. Next time you find yourself in need of a tin of cookies for a special occasion, try one of these recipes.


Sunday, November 11, 2018

Baking My Feelings

October 27, 2018 is a date I will always remember. It was a cold, rainy Saturday morning and I'd gone to the grocery early. My husband and I were sitting at the dining room table playing cards and finishing a late breakfast when the phone rang. It was my sister in Texas calling to see if I was alright. Apparently, there'd been a shooting in Pittsburgh. I grabbed my cell phone off the charger and saw a number of notifications for missed calls, text messages and news updates. At 10:30 that morning, a man walked into the Tree of Life synagogue in Squirrel Hill, the heart of the Jewish community, just three miles from my home, and opened fire with an automatic weapon slaughtering 11 people and wounding 6 more. Over the next few hours as details of this stunning tragedy emerged, fear rocked through me and my heart broke into pieces. My heart broke for the people in that congregation, for the families of those who died and for the community now faced with the aftermath. That was not my synagogue, I didn't know anyone involved, but this was my tribe, these were my people and my heart broke for all of us.

The next couple days were surreal as my phone, email and social media were flooded with messages of concern, love and support. A bad head and chest cold had settled into my body like an unwanted house guest, so I made an enormous pot of chicken noodle soup on Sunday afternoon. The following Monday, two days after the shooting, I choked back tears on my way to work, struggling to understand my ragged and chaotic emotions. By about 1:00 pm, I realized that I was not doing any good at work and I made an exit and wept the whole way home. After a few hours on the couch, I splashed my face with cold water and cleaned the kitchen. It felt good to let go of the thoughts that were tormenting me and focus on mundane tasks like scrubbing the sink and and the stove top. As I cleaned, my head began to clear a little bit and when I was done, I baked an apple crisp. With a small and simple list of ingredients, fruit crisps, crumbles and cobblers are things I no longer need recipes for. Peeling and slicing the apples, mixing in the sugar, lemon juice and cinnamon and making the crumb topping felt therapeutic and by the time I put the apple crisp in the oven, it felt like I was starting to get some mental control over the emotional chaos I'd been battling for the past couple of days. It just felt right. And as usual, the apple crisp was delicious.

The following night, I baked a batch of chocolate chip cookies and for a little extra twist, I added some finely chopped candied ginger. Again, it was a simple recipe, but the act of creaming the butter and brown sugar together until it was fluffy and sifting together the dry ingredients felt so grounding. And what could be more satisfying than biting into a warm, slightly chewy cookie fresh from the oven? It dawned on me that I was putting something delicious and beautiful out into the world to compensate for the bitterness and devastation I felt in my heart. I realized that I was baking my feelings.

In order to keep baking, I had to distribute the fruits of my labor, so the next day I brought both the cookies and what was left of the apple crisp, which was most of it, to work. It was Halloween and there was candy everywhere but my colleagues thoroughly enjoyed the homemade baked goods and I felt extremely gratified to present them. At the end of the day I brought home the empty containers and contemplated what I wanted to bake next. When they were at the peak of their season, my husband purchased a flat of blueberries and I had three huge bags of them in the freezer. Blueberry muffins seemed like an excellent choice. Muffins are not difficult to make and I found a suitable recipe that made a dozen muffins. However, for some unknown reason, I convinced myself that I needed to make more than a dozen. Looking back on it, I have no idea why I didn't just follow the recipe. In the end, I tried to make a recipe and a half of the batter, hoping for 18 muffins, but I miscalculated the measurements and the batter was extremely thick. I added an extra egg and an additional half cup of milk, but it didn't really help.
Rather than using muffin tins, I decided that batter would perform better in a bundt pan. The cake looked beautiful and I drizzled the top with a little lemon glaze, but it was dense and slightly gummy and the blueberries made big, wet pockets in the middle. It was tasty, but the texture was off-putting and almost rubbery. I talked it over with some of my co-workers the next day and someone suggested that it might make a good bread pudding. So the following weekend I cut it into cubes, discarding some of the larger blueberry pockets, put the cubes on a baking sheet and let them dry out in a 170 degree oven for a couple hours. Then I mixed up half a dozen eggs and two cups of whole milk, added some vanilla and cinnamon and soaked the cubed cake for a good 30 minutes, breaking it up with a potato masher as it softened. I poured it all into a baking dish, sprinkled the top with demarara sugar and gave it about an hour at 350 degrees. To test for doneness, I slipped a knife into the thick part of the center. When it came out clean, the pudding was baked.
It had a lovely bronze crust on top and a pleasant kind of bouncy texture without being gummy or sticky. I made a little blueberry sauce to go on top, but it would have been much better swimming in a pool of butter rum or thin caramel sauce. I cut the bread pudding into cubes and brought them to work the following Monday.

More than a week had passed since the shooting and I was finding a bit of peace in baking my feelings. The 2018 midterm elections were taking place the next day and half the country was holding its breath while the other half was blowing hot air in the build up to election day. I contemplated my baking options the night before. So far, I'd baked a crisp, a batch of cookies, a failed bundt cake and a bread pudding but what did I want to do next? Pie? Cupcakes? I needed something a little more challenging and settled on a two layer marble cake with chocolate frosting. I found a recipe and blog post that sounded perfect, which you can find HERE if you're curious. Instead of the whipped buttercream frosting called for in this recipe, I opted for my favorite frosting made with cream cheese, which I've made many times before. The tangy edge of the cream cheese keeps any cake from tasting too sweet and its my go-to frosting - you can find the recipe HERE. I had everything I needed for the cake in the fridge and pantry, but when I started pulling out ingredients, I realized that I had just enough baking powder to make this recipe. I don't think I've ever finished a container of baking powder. I use it so infrequently that I typically have to buy a fresh tub of it and throw the old one out every few years. But here I was, at the bottom of the container. A sense of great accomplishment washed over me. The moment the polls closed at 8:00 pm, I retired to the kitchen to make magic happen.
While the cake was baking, I joined my husband in front of the TV to watch election results, but in the end I found peace of mind in the kitchen, beating eggs and sugar together, measuring flour and cocoa and greasing and lining cake pans. It was 10:00 pm by the time I'd gotten the cake frosted and it looked quite impressive, but it definitely needed some time to chill in the fridge before I could cut this beauty. The thing about marble cake is you never know exactly how its going to look inside until you cut it. Not only was this cake gorgeous, but there was a surprise inside just waiting to be revealed. As much as I wanted to jam a fork into it and shove it in my greedy face, I put the cake in the fridge and went to bed. The next day, I brought it to work and sliced it with my co-workers looking on. It was absolutely beautiful inside and it tasted like heaven. We all enjoyed a slice of cake together and it filled my heart with indescribable joy.

Two days later I baked an apple pie. My brother and sister-in-law were coming to visit and she loves apple pie, so I figured I could brighten both of our lives a little by baking for her. It had been a busy week and I stopped at the store that day and bought a pre-made pie crust, which was a sign that I'm starting to come to terms with my feelings. The pie is yummy served with a scoop of vanilla ice cream. Half of it is sitting in the fridge right now and I have vowed not to bake again until we finish what I've already baked. While my heart still hurts, so do the hearts of my friends, neighbors and community and we are getting through this together. I don't think I'm the only Pittsburgher who is baking or cooking their feelings right now and I'm sure there will be more baking in the weeks and months ahead. In the end, there is great hope in the knowledge that we can sweeten our own small corners of the world when things seem hopeless. Let me know if you need a little lovin' from the oven. I'm more than happy to oblige.


Sunday, October 28, 2018

Dinner With Aunt Sue

This is not a story about food. Its not about a recipe or technique or some special piece of kitchen equipment. Its not about a product comparison, review or unique ingredient. This is a story about people and how food connects us.

Sue Wasserman and I grew up together in White Meadow Lake, New Jersey. Its a small, idyllic lakefront community in suburban NJ, about an hour west of New York City. We were part of the large group of kids born in the final years of the baby boom. We attended nursery school, grade school and middle school together. We went to summer camp, played sports and rode bikes together.
As we got older, Sue and I fell into different cliques and our interests diverged. She started a women's fencing team in high school and I was active in the theater program. When I was 16, my family relocated to Beaumont, Texas and by the time we all graduated from high school, I was only in touch with a couple of my many childhood friends. At some point in our 30's, a subgroup of friends reunited a few times and it was great to see each other after so many years, but Sue was not among us.

Say what you will about social media and its ill effects on our culture, but Facebook brought so many lost people back into my life and it has enriched me beyond words. Sue Wasserman is one of those people. I can't remember exactly when we started following each other on social media, but we became instant mutual fans. Sue lives near Asheville, NC and is a freelance writer, excellent photographer and a warm, charming and delightful person. She frequently comments on my food and music posts and she is also a fan of this blog. Sue inspired my post about honey cake when she came across a loaf pan in her kitchen cabinet. She's one of the coolest and most interesting people I follow. So when I started planning my travel to a conference in Atlanta, I reached out to Sue to see if she had the time to drive up and meet me for dinner.

Having lived in Atlanta for many years, Sue knows her way around and she comes to town somewhat frequently to see friends and family. When I extended the dinner invitation, she started asking around and settled on Secreto Kitchen, which was relatively close to my hotel, at least by Atlanta standards. Sue picked me up at my hotel and when we laid eyes on each other for the first time in 40 years, I was instantly transported back to grade school. We talked nonstop on the way to the restaurant.
The place was perfect and we got a table in the front corner of the cozy dining room. It was kind of a quiet Tuesday evening with just a few other tables besides us. We ordered beverages and started catching up on the last four decades.

Over an order of creamy truffle deviled eggs, Sue and I reminisced about Camp White Meadow and our years at Stony Brook elementary. The deviled eggs were yummy and the conversation was easy. We talked about our families and their expectations of us and how we paved our unique and winding paths in life. We both ordered the fried chicken and it came with a delicious sausage gravy, smooth mashed potatoes and crunchy green beans. As we tucked in to our dinner, the conversation moved to college and the early years of our careers. Sue started as a copywriter at a small ad agency before moving down to Atlanta and doing corporate communications work.
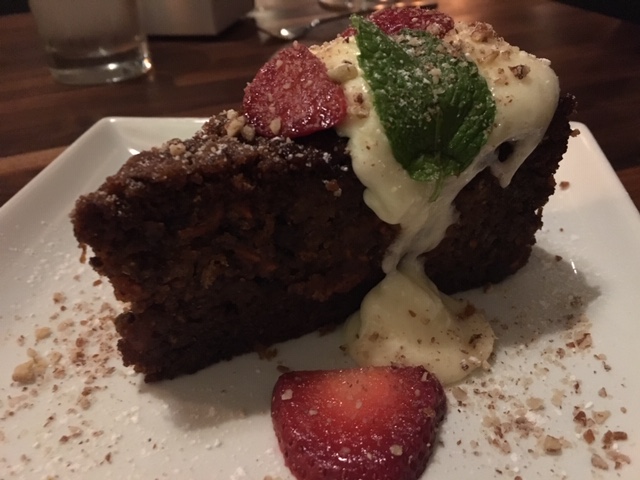
We talked about our friends, where they went and how they turned out. We talked about our mothers and the amazing influence they had on our identities. Secreto is known for its carrot cake, so we ordered a slice and dug into our philosophies on life. The carrot cake jiggled a little when the waiter put the plate down on the table. It was impossibly moist and almost custardy, as if its had been steamed, and it had a dollop of cream cheese frosting cascading over the top. As we enjoyed our dessert, we shared our hopes and dreams and talked about how it feels to reinvent ourselves. It was a three hour dinner and I wouldn't have traded one second of for all the money in the world.

The whole dinner was great, but ultimately, the food was just a vehicle for authentic human connection. Sue and I share a love for great food and we both deeply understand how a meal prepared with love provides nourishment for the body and the soul. That, my friends, is worth writing about.


Sunday, October 21, 2018

Bacon Roast

I had no idea what to expect when my husband suggested we go to a bacon roast. I mean, clearly we'd be eating roasted bacon, but the circumstances by which this bacon ended up in our bellies was a bit of a mystery. Jason's friend Barb had extended the invitation and she and I share eastern European heritage. She is of Croatian lineage, I have Hungarian roots and we both love the Hungarian dishes we grew up eating. In addition to the usual catered chicken, baked pasta and roasted veggies, Barb included cabbage rolls and haluski on the banquet table at her retirement party last spring. I surmised the bacon roast was a traditional Hungarian preparation that had eluded me thus far. Barb made the reservations and all we had to do was to show up at Huszar, pay our money and enjoy the experience, whatever that might be. As long as there was roasted bacon in my mouth, I was game for whatever the evening would bring.

In Hungary its called Szalonna Sutes and its a summer tradition in rural and farming communities, much like the classic American barbecue. Giant slabs of bacon are cut into large chunks, skewered on long sticks or roasting forks and each person cooks their chunk of bacon slowly over an open fire pit. As the bacon cooks, the fat renders and you're supposed to use a piece of bread to absorb the drippings, which eventually becomes the delivery vehicle for the cooked bacon. It takes about 30 minutes to roast a half-pound slab of bacon over an open fire, at which point its chopped into small cubes and served on the fat soaked bread with raw onion, red bell peppers and tomatoes. This is accompanied by a shot of noxious plum brandy called palinka, plenty of beer, and lots of storytelling and laughter around the fire. Literally and figuratively, chewing the fat.

On the first chilly weekend of the fall, we headed to Pittsburgh's historic Deutschtown neighborhood for our 5:00 pm reservation. Huszar is a small, welcoming, typical Pittsburgh neighborhood tavern serving authentic Hungarian fare, all prepared fresh in their small kitchen. With its small bar and cozy dining room, this is the kind of place where you instantly feel at home. Barb and her friend Nancy were sitting at the bar sampling Karlovochka beer and small but mighty shots of palinka. We joined them and the bartender brought us our beer and clear shots of palinka, which burned all the way down my throat and started a small fire when it hit bottom.

Sides and condiments
About 20 minutes later we were invited to a large patio just up the street, which had a temporary wood fence in front. There were 8 or 10 long tables with chairs, a tent with a couple of prep tables for the bacon, condiments and desserts and 3 fire pits surrounded by chairs. We walked up to the prep table, collected our long forks with our bacon on the end and headed to a fire pit to settle in with our pork. About half way through our roasting time,The Gypsy Strings arrived and a celebratory vibe overtook the whole evening as the patio filled with traditional eastern European folk music.
Desserts
It was cold outside, but the glow of the fire, excellent company and adult beverages warmed our spirits. We struck up conversations with the other folks at our fire pit and had a grand old time.

When our bacon was done, we brought it back to the prep table where our hosts chopped it up into bite sized pieces and piled raw veggies on our plates. With potato salad on the side and delicious small pastries for dessert, it was quite an abundant feast! The pork was smokey, briny and luscious. There were strains of fat running through each little chunk and slightly charred and crispy bits on the ends. Sandwiched on that fatty bread with crispy red pepper slices, juicy tomatoes and the sharpness of raw scallions, that bacon was pure delight. Barb and I had trouble finishing ours so my helpful husband took care of the remnants. No way we were walking out of that place with uneaten bacon on our plates. This is the third year that Huszar has hosted the bacon roast and its well on its way to becoming a Pittsburgh tradition. Maybe you'll join us next year.


Sunday, October 7, 2018

Semolina Pasta

It all came together so perfectly. I had all the requisite ingredients, the inspiration struck at the opportune moment and there I was, breaking out the pasta machine. For our anniversary, my thoughtful and considerate husband decided to take me on an outing in search of local produce, meat and eggs. Schramm's farm store had baskets of huge, ripe tomatoes at their peak of flavor for about $3.00. Each basket had 6 or 7 soft-ball sized tomatoes and at that price, I couldn't NOT buy one. On the way home, I realized that there were already two quarts of tomatoes from our garden in the freezer. The tomatoes I just bought would need to be processed quickly and I had the whole weekend to make it happen. As my thoughts turned to recipes, I remembered the bag of semolina flour I'd bought a few weeks earlier. There it was, the moment of inspiration. I think I actually heard a little "ding" in my head when the idea of making semolina pasta with homemade tomato sauce hit me. Don't you just love it when that happens?

There's really no comparison between your own fresh pasta and what comes out of a cardboard box.  They're almost two different food items. Mind you, I'm not knocking dry pasta here, its a pantry staple and something I use frequently. But when you want to go that extra mile, making your own fresh pasta is not as difficult as you think and it never fails to impress. Most pasta is made either with all-purpose flour, super fine 00 flour or semolina  flour and each imparts its own unique taste and texture. 00 flour is very fine and powdery, which gives the pasta dough a smooth surface and the finished product is fluffy and light when cooked. Semolina has a courser texture than flour, which results in more toothsome pasta, and the slightly grainy surface allows it to hold the sauce nicely, just like ridges on certain types of dried pasta. I found recipes that used straight semolina flour and some that mixed it with regular all-purpose flour and since this was my first time using semolina, I decided to use a mix of the two.

SEMOLINA PASTA

1 cup semolina flour
3/4 cup all-purpose flour
2 large eggs at room temperature
1 tbsp olive oil
1 tsp salt
3 tbsp water

Pasta dough can be made easily in the food processor, but if you don't have one you can mix this dough in a bowl. Measure the two flours and salt into a large bowl and mix them together. If you're using the food processor, blitz the dry ingredients a couple times just to mix them. Crack the eggs into a glass jar and add the water and olive oil, put the lid on it and shake it to blend well. With the processor running, drizzle the egg mixture in until it forms a ball, then turn it out to knead it. If you're using the bowl, just mix everything together until it forms a ball, then turn it out onto the counter and knead it until its smooth and slightly springy, which should take about 5 minutes. If the dough is too wet and sticky, knead small bits of flour in as you go until the dough no longer sticks to the surface. When its smooth and uniform, wrap the dough in plastic wrap and put it in the fridge for about half an hour to rest.

Of course, the pasta dough was the last thing I did that weekend. Making tomato sauce from scratch is not terribly difficult and it tastes infinitely better than anything you get out of a can or jar. The previous day, I turned 7 gigantic tomatoes into deeply flavored sauce using the basic process and recipe here on this blog, adding fresh mushrooms instead of dried. The sauce cooked for about three hours and while it was on the stove, I kept it covered loosely with a piece of aluminum foil. The foil allows steam to escape as the sauce reduces but keeps it from splattering all over the kitchen. Trust me, this technique will save you from cleaning tomato sauce off of the ceiling. I learned the hard way. Tomato sauce always tastes better after it sits in the fridge. This pot of sauce sat overnight and was all ready to go the next day when I started rolling that pasta.

 I took the dough out of the fridge and let it sit for about 10 minutes before rolling it. Now, a pasta machine is not necessary here, the dough can be rolled out with a rolling pin, but it needs to be really thin and since I have a pasta machine, I used it. This pasta had an interesting cornmeal-like texture, but it rolled out nicely and when it was thin enough to just barely see through, I cut it into thick ribbons, tossed them in a little flour and set them on a kitchen towel while I brought a big pot of liberally salted water to a boil. I just happened to have a small zucchini sitting in the fridge, so I cut it into small chunks and sauteed them in a skillet, then poured some of my tomato sauce in and let that heat up over low heat.
Once the water was boiling vigorously, I dropped in the pasta and gave it a stir. Fresh pasta cooks very quickly, it only take about a minute, and when it was al dente I pulled it out with tongs and dropped it right into the sauce, adding a ladle full of pasta water to keep the sauce loose. I let the pasta continue to cook in the sauce and absorb the flavors for a couple minutes before serving. A healthy grating of Parmesan cheese and a little drizzle of extra virgin olive oil brought  this bowl of handmade pasta to perfection. The chewiness of this pasta was quite pleasant and I was happy with the results. Plus, no cans, jars or cardboard boxes were harmed in the making of this dinner. All homemade, its the way to eat.


Sunday, September 16, 2018

The Best Corn Fritters

Summer is drawing to a close here in western Pennsylvania. The heat wave broke right after Labor Day and the last of summer's bounty is ready for harvest. While trolling Facebook marketplace, my clever husband found a woman in Export, PA who raises chickens and sells their eggs. After doing a little research, he'd found a nice looking farm stand and a local meat market nearby. With a slight chill in the air, he surprised me with a Saturday morning outing in search of farm fresh vittles.

We started out right after breakfast and reached our first stop Schramm Farms & Orchards not long after they opened. The Schramm family really knows what they're doing and just about everything for sale in the spacious, clean farm store is grown on their own farm. We bought ginger gold apples, onions, honey and a basket of the biggest, reddest and most fragrant tomatoes I've ever seen. But the real score at Schramm's was the corn. We bought a dozen ears of bi-color corn that had just been picked that morning. I was truly in my happy place. After a trip to C&S Meats for some chicken, we hit our final destination, our new friend Candice's house. Candice has a small flock of chickens and the younger ones have just started laying, so we bought a dozen eggs and made our way home for an afternoon of food prep.


With a dozen ears of corn sitting in my fridge, I had some decisions to make. I knew some would go in the freezer and some would be boiled and eaten right off the cob, but I had a swinging load of corn to deal with. Then I remembered an episode of America's Test Kitchen where Dan Souza demonstrated a unique method for making the most yummy looking corn fritters. By pureeing and cooking half the corn first, the batter needs less flour and delivers maximum corn flavor. That sounded just fine with me.


CORN FRITTERS:

4 ears of fresh corn
2 tbsp all purpose flour
2 tbsp grated Parmesan cheese
2 tbsp corn starch
1 large egg
2 tbsp butter (for cooking the corn)
1 small minced jalapeno pepper (optional)
1 tsp salt
1/2 tsp black pepper
vegetable oil for frying

The first step of this interesting preparation involves turning half the corn into a puree. I cut the kernels off of two ears of corn directly into a large, deep mixing bowl. My blender is out of commission right now, so I used an immersion blender the pulverize the corn into a thick puree. Mine was a lot chunkier than Dan's, but you can achieve a smoother texture by using a traditional blender. I put a medium skillet over medium low heat and dropped in a tablespoon of butter. Corn has a lot of natural sugar in it and it will burn if you cook it over high heat, so its best to keep the temperature moderately low while cooking this puree. It also wants to stick to the pan, so make sure you stir this mixture frequently as it cooks. Once the butter was melted, the corn puree went into the pan and I cooked it over medium low heat until it turned a deep golden color and was very thick and pasty, almost the texture of polenta, which took about 10 minutes. I scooped it into a mixing bowl and set it aside to cool. Then I cut the kernels off of the remaining two ears of corn and got ready for the next step.

Now, if you've ever made corn fritters before, you know the whole process is quite messy. Corn flies everywhere when you cut it off the cob, so I cut mine directly into a big, deep bowl. The other big mess happens when you fry the fritters and pieces of fresh corn, which are filled with water, explode when they hit the hot oil. It can be quite dangerous and my husband and I have both gotten nasty little burns from hot corn shrapnel. The solution is to cook the corn kernels first, which allows the water to evaporate and the flavors to develop. Its nice to let the kernels brown a bit in the pan to give them a smokey taste. I cleaned the pan I'd just used to cook the puree, put it over medium heat and added the rest of the butter and the corn kernels. While they toasted in the pan, I put the rest of the ingredients into the bowl with the cooled corn puree, mixing the egg up slightly before adding it, and gently blended it all together. The original recipe called for chives and a pinch of cayenne pepper, but the combo of corn and jalapeno is such a classic pairing and I just happened to have jalapenos growing in my garden. I could imagine adding a little cumin or curry powder to the basic recipe for an exotic flavor. Fresh herbs like parsley or cilantro would be good, too. Go wild, do whatever strikes your fancy.

Once the corn kernels were slightly browned. I added them to the bowl and got ready to fry these bad boys up. In a large skillet, I poured enough vegetable oil to come about an inch up the side of the pan and turned the heat to medium, allowing the oil to heat slowly so my fritters wouldn't scorch. To test the oil, drop a little nub of fritter batter in. If it starts bubbling, you're good to go. I added tablespoonful dollops of the batter to the oil and flattened each one out a bit using the back of the spoon. When the edges were golden, I flipped them and let them cook until they were GBD - golden brown and delicious. I drained them momentarily on paper towel, just to remove a bit of the oil, and ate them hot with a little drizzle of homemade honey mustard sauce, which is just 2 tbsp of mayo and 1 tbsp each of honey and dijon mustard. The corn starch in this recipe makes the fritters crispy and the cooked corn puree makes them slightly chewy and really, really corny. Plus, no splatter burns and my kitchen didn't look like a complete disaster when I was done. Serve them as a side dish, an appetizer or a snack, I promise these corn fritters are perfect for any occasion.


Sunday, September 9, 2018

Caponata

Every summer I plant something different in my garden, just to see how it works. The potatoes were interesting, we grew enough to make a big bowl of potato salad. We tried banana peppers, but how many banana peppers can two people eat? My husband enjoyed the yellow squash, but I got tired of them quickly. This year, we decided to plant onions and Japanese eggplant. The onions grow from starts that are planted early in the spring and harvested after their greens die back, usually in the fall. Our onions didn't do very well and their green shoots died back early, so we dug the tiny, plum-sized onions up. The eggplant, however, flourished and when we came back from our August vacation we found half a dozen long, curved, slender eggplants on the plant.

I picked them all, then stood in my kitchen and wondered what the hell to do with them. Japanese eggplant are skinnier, more delicate and have thinner skins than the large, bulbous Italian eggplant we typically find in the grocery store. I wanted a recipe that would showcase their sweet and succulent flavor and caponata sounded like an interesting choice. Caponata is a Sicilian appetizer or relish made of sauteed eggplant with celery, onions and tomatoes flavored with vinegar, sugar, capers and olives for a sweet and sour effect. Its delicious served cold with crackers or toasted bread or spooned over a piece of fish or chicken. I read several recipes, gathered some ideas and went to work.

CAPONATA

4 cups cubed eggplant
1 cup diced celery
1 cup diced yellow onion
2 cups peeled, chopped tomatoes
2 cloves minced garlic
1 tbsp tomato paste
3 tbsp capers
1/2 cup chopped green olives
3 tbsp white or red wine vinegar
1 1/2 tbsp sugar
salt, pepper, chopped fresh parsley, thyme or basil to taste

You can prepare this luscious concoction any number of ways. Some recipes call for splitting the eggplant, roasting it in the oven and scooping out the flesh when its soft. Some recipes call for chopping all the veggies and roasting them together on a sheet pan in a really hot oven. I suppose those methods would add more of a smokey flavor, but once the eggplant is roasted it still needs to be cooked together with the tomatoes, garlic and other ingredients. I opted for the ease and simplicity of a single skillet preparation. Regardless of the technique, the idea is to cook the vegetables down so they become soft and sweet, but not until they disintegrate and disappear. Since the eggplant skins can be tough and indigestible, I decided to peel mine but its more traditional to leave the skins in tact.

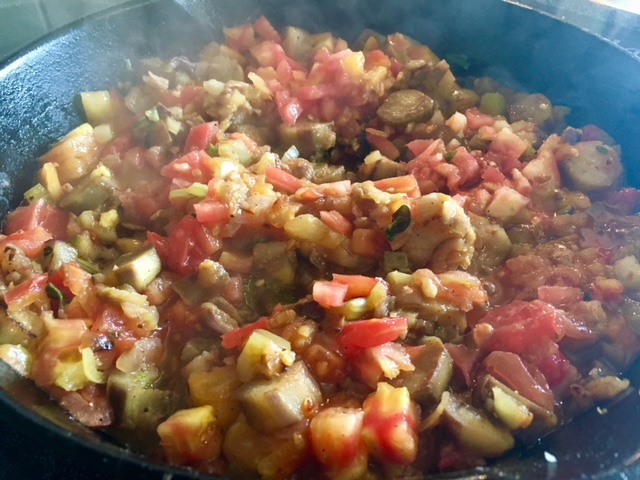
I started with the onions and celery, cooking them over medium high heat with salt and pepper in a large skillet just until slightly translucent. I added the garlic and tomato paste and toasted them briefly before tossing in the eggplant. Allowing this to cook over relatively high heat will give you some caramelization in the bottom of the pan, which adds that depth of flavor you want in caponata. I let this go for about 10 minutes, until the veggies started to stick to the pan a bit and there was a nice layer of fond developing. I added the tomatoes, 2 tablespoons of vinegar and 1 tablespoon of sugar and as I stirred, I scraped up that beautiful fond and mixed it all back in as it cooked. At this point, the whole mixture needs to cook over medium low heat for about 15 minutes to allow the tomatoes to break down, the liquid to evaporate and the flavors to concentrate.

As the caponata cooked, it filled my house with a tangy and savory aroma. After 15 minutes, the tomatoes had integrated and the veggies were soft, but the eggplant and celery still held their shapes. I added the capers, olives and the rest of the vinegar and sugar and gave it just 5 more minutes to simmer gently before removing the pan from the heat. At this point, you could add different things like raisins or pine nuts depending on your taste, but I left mine as is. Since this mixture is best served cold or at room temperature, its important that the seasoning is right. When foods are chilled, the flavors become muted, so make sure you have enough salt and pepper to account for diminished flavor when the caponata is cold. I tasted, adjusted the seasoning, added some fresh herbs and put the finished caponata in a bowl in the fridge while I toasted some sliced baguette for the big reveal.

We enjoyed our caponata as a pre-dinner snack, slathered on crispy, toasted baguette slices with a nice glass of hard apple cider. The eggplant and celery had mostly cooked down, but there were still visible chunks and the bright, briny pop of the green olives and capers whetted our appetites. The caponata sat in the fridge all week and each day when we got home from work, we'd snack on it and marvel at how much better the taste was from the day before. The longer this stuff sits in the fridge, the yummier it gets and its an excellent vehicle for showcasing the unctuous earthiness of eggplant. So next time you're looking for an unusual hors d'oeuvres, give caponata a try.


Sunday, August 26, 2018

The Hebrew Buckaroo

On Saturday morning, I got the call. It was the culinary equivalent of the bat signal from the old Batman show. Our friends and neighbors Allison and Adam had just brought their newborn daughter home from the hospital the day before. I told Adam I was planning to cook on Sunday and asked if they'd like me to bring them some sustenance. The answer was an emphatic YES! "Any special requests?", I asked. Adam replied, "Well, if you're feeling ambitious, Allison proclaims "Challah".  This looked like a job for The Hebrew Buckaroo!

Yes, I know its ridiculous, but in that moment, I kind of felt like a super hero and my challah was a secret weapon used to fight the effects of physical and psychological hunger. But why stop there, I thought, if I'm buying into this whole super hero thing, I might as well go for broke. Nothing is more nourishing, comforting or welcomed than a pot of homemade chicken soup and it just so happens that my chicken soup has super, or should I say "souper" powers. When I asked Adam if he preferred noodles or matzoh balls, you can guess what the answer was. With a plan in hand, I set off to the grocery store. The only thing missing was my cape and mask.

I've posted both of these recipes before and made hundreds of pots of chicken soup and dozens of challahs, You'll find recipes, step by step instructions and some interesting writing here:

HOMEMADE CHICKEN SOUP

HOMEMADE CHALLAH

When I got up Sunday morning, I was feeling especially powerful. About half way through my first cup of coffee, the super powers kicked in and I headed to my laboratory, eh, I mean kitchen, to begin making the soup of justice.

Since it proofs twice before being shaped, I started with the challah. I emptied a package of rapid rise yeast into a large mixing bowl, squeezed in about a tablespoon of honey and poured in half a cup of warm water to activate the yeast. While the yeast's super powers sprang to life, I moved on to the next step and put a stick of butter, half a cup of sugar and a cup of whole milk in a small saucepan over medium low heat, just to allow the butter to melt. It only takes about 5 minutes for the yeast to activate and once it was frothy, I cracked the eggs in and whisked them up a bit before stirring in the warm milk mixture. Its important that the milk is no warmer than about 100 degrees or it will kill the yeast. With all the wet ingredients combined, I added 3 cups of bread flour and started mixing. The recipe calls for 6 1/2 cups of flour, but I find 6 cups to be enough for a soft, fluffy and delightful dough. I like to mix the flour in one cup at a time until it comes together into a ball, at which point I turn it out onto my surface and start kneading. If the dough is too sticky, I just knead in more flour a handful at a time until the dough is pliable and easy to knead. After about 10 minutes of vigorous kneading, the dough was perfect and I dropped it into a greased container for its first rise of 90 minutes.

With the challah on the rise, I turned my attention to the soup. I keep a large ziplock bag in the freezer that I use to store a variety of soup fixins. When I roast a whole chicken or turkey, the bones go into the soup bag. Celery tops, old carrots and even yellow onion skins go into the soup bag. It usually contains chicken backs, necks and wingtips, veggie trimmings and even parsley or dill stems. There are a ton of nutrients and lots of flavor in what most people would toss in the garbage. In my house, it becomes soup. My soup bag was full and I added everything to my largest stock pot along with a whole 4 lb chicken, a smoked turkey wing, a couple bay leaves, a handful of parsley and dill from my garden and several garlic cloves. I added one can of chicken broth and filled the pot with cold water until the chicken was just submerged. I put the lid on the pot and turned the heat to medium low for a whole day of simmering.

The rest of my Sunday was spent finishing this good deed, deflating the challah dough and setting it in a warm place for its second rise, removing the whole chicken from the pot once it was cooked through and letting it cool so I could remove the meat and return the bones to the soup pot and getting the matzoh ball mixture ready and in the fridge to set up. It was a day of cooking filled with care, heart and spirit. My broth was rich and golden, the matzoh balls fluffy and tender and the challah was picture perfect. It was all still piping hot when we arrived at Allison and Adam's house with our special delivery. We met the newborn Sasha Alexandra and visited with our friends for a while before leaving them to their matzoh ball soup and warm challah, which turns out is Allison's favorite meal. The Hebrew Buckaroo saved the day.

So, when the evil grip of illness sneaks in or when dastardly hunger strikes, when the devastating creep of winter threatens to cast its evil shadow over all the world or when the low rumble of empty bellies cry out for nourishment, The Hebrew Buckaroo will be there with the soup of justice.


Saturday, July 14, 2018

I Can Pickle That!

Every summer, I tell myself that its the last time I'm planting cucumbers. And every summer, I find myself buried under a mountain of cucumbers. Last year I planted four cucumber plants and by the end of July I never wanted to see another cuke again. Out of necessity, I learned to make pickles and it opened my eyes to the glorious world of homemade brined vegetables. This year I was smart and planted two Kirby cucumber plants, which is a variety specifically designed for pickling. When the giant dill pickle balloon is flying over the Rachel Carson bridge in downtown Pittsburgh, welcoming people to our annual Picklesburgh festival in July, its time to kick into full pickle production mode.

So far, I've harvested at least 40 cucumbers from two plants that I started in early May. The first batch became sour pickle chips with a simple vinegar brine. This basic recipe calls for equal parts of white distilled vinegar and water, with a little salt and whatever flavorings you like. You can add garlic, peppercorns, dill seed or even dill sprigs to enhance the flavor. I also made 12 jars of bread & butter pickles based on the recipe I used last summer. Click here to read about it. But the ones I am most proud of are the fermented pickles that spent a week sitting in a bowl on my kitchen counter. This was my first attempt at fermented pickles and I am awed by how authentic they taste. 

Fermented vegetables were a staple in the diets of my eastern European Jewish ancestors. The fermentation process allows the natural sugars in the vegetables to turn into lactic acid, which creates an acidic environment that prevents the growth of bacteria that would normally cause food to spoil. Its an easy and inexpensive way to preserve foods for extended periods of time, which is great for long, harsh winters. The crunch and sharpness of brined veggies also makes an excellent counterpoint to the often bland meat & potato based diets that were common in places like Poland and Russia. When immigrants came to America from eastern Europe, they brought this tradition with them and the kosher dill pickle became a popular street food and standard fair in Jewish delicatessens. The cucumbers were washed and stacked in barrels with dill, garlic, spices, salt and clean water and left to ferment in a relatively warm place for a few weeks or even a few months. The longer they sit in the brine, the more flavorful they become. I grew up on those pickles and have vivid memories of fishing them out of the huge barrel at Tabachnick's deli. 

FERMENTED PICKLES

10 large pickling cucumbers
5 cups clean water, filtered or distilled
5 tbsp pickling salt
5 large sprigs of fresh dill or a tablespoon of dill seeds
5 cloves of garlic
About 20 black peppercorns
2 bay leaves
2 grape leaves or horseradish leaves (optional)

There is quite a bit of science behind the perfect naturally fermented pickle and they deliver health benefits that shelf-stable vinegar brined pickles do not. Fermented foods are an excellent source of probiotics, which are essential for gut health and aid in digestion as well as boosting your immune system. Fermentation helps break down cellulose in the skin and seeds of the vegetables, making them easier to digest. Because pickles are highly acidic, bad things like e.coli are unable to survive in that environment. A word of caution, however, while the ingredients and preparation are very simple, there are plenty of things that can go wrong. The more you know, the less likely you will end up with mushy or even moldy pickles. 

First, choose the right cucumber. Look for varieties that are bred specifically for pickling, like Kirby or Alibi. If you use standard slicing cucumbers, which have thinner skins and more moisture, your pickles may turn to mush. Pickling varieties are smaller, shorter, have thicker skin and less moisture, which allows them to soak up the brine more effectively. Second, make sure you use the right salt. Ordinary table salt contains iodine and other chemicals that can interfere with the fermentation process. Kosher salt will work, but pickling salt also contains an enzyme that inhibits the growth of bacteria. Make sure the salt you use does not contain iodine. Finally, the addition of tannin will help keep your pickles crisp, which is where the bay leaves, grape leaves or horseradish leaves come in. I was extremely fortunate because my husband decided to grow horseradish in the garden this year, so I was able to use a leaf in my pickles. However, horseradish leaves will probably be impossible to find, but grape leaves are available in the specialty section of your grocery store. If you can't find them, use a couple extra bay leaves. They'll help keep your pickles crunchy and add a little extra flavor. 

Fermented pickles, day 1
So that's it. Are you ready to pickle? Before you begin, wash your cukes really well in cold water and make sure you remove any remaining bits of blossom. Leave your cucumbers whole for this preparation to make sure the brine doesn't break down the flesh too quickly. Find a nice, deep bowl or large jar in which your cucumbers will fit snugly. The cucumbers need to stay completely submerged in the brine and not be exposed to any air or they'll mold. I used a deep earthenware bowl that I covered with plastic wrap, but if you have a deep bowl with a lid, that would work well. For every cup of water, use one tablespoon of salt and heat the water up slightly just to dissolve the salt more easily. Also, if your cucumbers are really cold, the warm water will help them come to room temperature more quickly. Add the salt, garlic, bay leaves, dill seed and peppercorns to the water and warm it up over low heat. In the bottom of your bowl, place a couple sprigs of dill and half of the grape leaf or horseradish leaf. Place the cucumbers in the bowl, making sure you have enough room so they will be completely submerged in the brine. Once the salt is dissolved, pour the brine over the cucumbers and put the rest of the dill and the other half of the grape or horseradish leaf on top. If the cukes float, place a small plate over them to make sure they stay below the surface of the liquid. Cover your container with plastic wrap and find a spot that's out of the way to let them ferment. The best temperature for this process is between 68 and 72 degrees, so don't let them get too cold or too hot. 

Fermented pickles, day 5
It was so difficult for me to be patient and for the first few days, I looked at my pickles a couple times a day. On the third day, I took one out of the brine and sliced it. The color had changed slightly from its original bright green to a duller, more olive color. It was starting to ferment, but still tasted mostly like a cucumber. On the fifth day, the brine began to look cloudy and little bits of foam were floating on the surface. This is a normal bi-product of fermentation and I decided to have another taste. If you've ever eaten a half-sour, you'll know what my pickle tasted like after five days in the brine. It was still quite crunchy and tasted like a cucumber, but the brine had definitely penetrated the skin and that classic deli-style pickle flavor was developing.

Fermented pickles, day 8
On the eighth day, I tasted again and this time they were perfect. Still crunchy, very briny, sour and complex, I had succeeded in fermenting my own pickles. They were soft, but not mushy and there was a pleasant tingle when I bit into the slice. They tasted exactly like the kosher dill pickle of my youth. I took the remaining seven pickles out of the bowl, put them in containers, poured the brine over them and set them in the fridge. Since the garden is still in full production, this won't be the last batch of fermented pickles I'll be making this year. I'm looking forward to sharing my briny prize with friends and family.