Sunday, September 16, 2018

The Best Corn Fritters

Summer is drawing to a close here in western Pennsylvania. The heat wave broke right after Labor Day and the last of summer's bounty is ready for harvest. While trolling Facebook marketplace, my clever husband found a woman in Export, PA who raises chickens and sells their eggs. After doing a little research, he'd found a nice looking farm stand and a local meat market nearby. With a slight chill in the air, he surprised me with a Saturday morning outing in search of farm fresh vittles.

We started out right after breakfast and reached our first stop Schramm Farms & Orchards not long after they opened. The Schramm family really knows what they're doing and just about everything for sale in the spacious, clean farm store is grown on their own farm. We bought ginger gold apples, onions, honey and a basket of the biggest, reddest and most fragrant tomatoes I've ever seen. But the real score at Schramm's was the corn. We bought a dozen ears of bi-color corn that had just been picked that morning. I was truly in my happy place. After a trip to C&S Meats for some chicken, we hit our final destination, our new friend Candice's house. Candice has a small flock of chickens and the younger ones have just started laying, so we bought a dozen eggs and made our way home for an afternoon of food prep.


With a dozen ears of corn sitting in my fridge, I had some decisions to make. I knew some would go in the freezer and some would be boiled and eaten right off the cob, but I had a swinging load of corn to deal with. Then I remembered an episode of America's Test Kitchen where Dan Souza demonstrated a unique method for making the most yummy looking corn fritters. By pureeing and cooking half the corn first, the batter needs less flour and delivers maximum corn flavor. That sounded just fine with me.


CORN FRITTERS:

4 ears of fresh corn
2 tbsp all purpose flour
2 tbsp grated Parmesan cheese
2 tbsp corn starch
1 large egg
2 tbsp butter (for cooking the corn)
1 small minced jalapeno pepper (optional)
1 tsp salt
1/2 tsp black pepper
vegetable oil for frying

The first step of this interesting preparation involves turning half the corn into a puree. I cut the kernels off of two ears of corn directly into a large, deep mixing bowl. My blender is out of commission right now, so I used an immersion blender the pulverize the corn into a thick puree. Mine was a lot chunkier than Dan's, but you can achieve a smoother texture by using a traditional blender. I put a medium skillet over medium low heat and dropped in a tablespoon of butter. Corn has a lot of natural sugar in it and it will burn if you cook it over high heat, so its best to keep the temperature moderately low while cooking this puree. It also wants to stick to the pan, so make sure you stir this mixture frequently as it cooks. Once the butter was melted, the corn puree went into the pan and I cooked it over medium low heat until it turned a deep golden color and was very thick and pasty, almost the texture of polenta, which took about 10 minutes. I scooped it into a mixing bowl and set it aside to cool. Then I cut the kernels off of the remaining two ears of corn and got ready for the next step.

Now, if you've ever made corn fritters before, you know the whole process is quite messy. Corn flies everywhere when you cut it off the cob, so I cut mine directly into a big, deep bowl. The other big mess happens when you fry the fritters and pieces of fresh corn, which are filled with water, explode when they hit the hot oil. It can be quite dangerous and my husband and I have both gotten nasty little burns from hot corn shrapnel. The solution is to cook the corn kernels first, which allows the water to evaporate and the flavors to develop. Its nice to let the kernels brown a bit in the pan to give them a smokey taste. I cleaned the pan I'd just used to cook the puree, put it over medium heat and added the rest of the butter and the corn kernels. While they toasted in the pan, I put the rest of the ingredients into the bowl with the cooled corn puree, mixing the egg up slightly before adding it, and gently blended it all together. The original recipe called for chives and a pinch of cayenne pepper, but the combo of corn and jalapeno is such a classic pairing and I just happened to have jalapenos growing in my garden. I could imagine adding a little cumin or curry powder to the basic recipe for an exotic flavor. Fresh herbs like parsley or cilantro would be good, too. Go wild, do whatever strikes your fancy.

Once the corn kernels were slightly browned. I added them to the bowl and got ready to fry these bad boys up. In a large skillet, I poured enough vegetable oil to come about an inch up the side of the pan and turned the heat to medium, allowing the oil to heat slowly so my fritters wouldn't scorch. To test the oil, drop a little nub of fritter batter in. If it starts bubbling, you're good to go. I added tablespoonful dollops of the batter to the oil and flattened each one out a bit using the back of the spoon. When the edges were golden, I flipped them and let them cook until they were GBD - golden brown and delicious. I drained them momentarily on paper towel, just to remove a bit of the oil, and ate them hot with a little drizzle of homemade honey mustard sauce, which is just 2 tbsp of mayo and 1 tbsp each of honey and dijon mustard. The corn starch in this recipe makes the fritters crispy and the cooked corn puree makes them slightly chewy and really, really corny. Plus, no splatter burns and my kitchen didn't look like a complete disaster when I was done. Serve them as a side dish, an appetizer or a snack, I promise these corn fritters are perfect for any occasion.


Sunday, September 9, 2018

Caponata

Every summer I plant something different in my garden, just to see how it works. The potatoes were interesting, we grew enough to make a big bowl of potato salad. We tried banana peppers, but how many banana peppers can two people eat? My husband enjoyed the yellow squash, but I got tired of them quickly. This year, we decided to plant onions and Japanese eggplant. The onions grow from starts that are planted early in the spring and harvested after their greens die back, usually in the fall. Our onions didn't do very well and their green shoots died back early, so we dug the tiny, plum-sized onions up. The eggplant, however, flourished and when we came back from our August vacation we found half a dozen long, curved, slender eggplants on the plant.

I picked them all, then stood in my kitchen and wondered what the hell to do with them. Japanese eggplant are skinnier, more delicate and have thinner skins than the large, bulbous Italian eggplant we typically find in the grocery store. I wanted a recipe that would showcase their sweet and succulent flavor and caponata sounded like an interesting choice. Caponata is a Sicilian appetizer or relish made of sauteed eggplant with celery, onions and tomatoes flavored with vinegar, sugar, capers and olives for a sweet and sour effect. Its delicious served cold with crackers or toasted bread or spooned over a piece of fish or chicken. I read several recipes, gathered some ideas and went to work.

CAPONATA

4 cups cubed eggplant
1 cup diced celery
1 cup diced yellow onion
2 cups peeled, chopped tomatoes
2 cloves minced garlic
1 tbsp tomato paste
3 tbsp capers
1/2 cup chopped green olives
3 tbsp white or red wine vinegar
1 1/2 tbsp sugar
salt, pepper, chopped fresh parsley, thyme or basil to taste

You can prepare this luscious concoction any number of ways. Some recipes call for splitting the eggplant, roasting it in the oven and scooping out the flesh when its soft. Some recipes call for chopping all the veggies and roasting them together on a sheet pan in a really hot oven. I suppose those methods would add more of a smokey flavor, but once the eggplant is roasted it still needs to be cooked together with the tomatoes, garlic and other ingredients. I opted for the ease and simplicity of a single skillet preparation. Regardless of the technique, the idea is to cook the vegetables down so they become soft and sweet, but not until they disintegrate and disappear. Since the eggplant skins can be tough and indigestible, I decided to peel mine but its more traditional to leave the skins in tact.

I started with the onions and celery, cooking them over medium high heat with salt and pepper in a large skillet just until slightly translucent. I added the garlic and tomato paste and toasted them briefly before tossing in the eggplant. Allowing this to cook over relatively high heat will give you some 
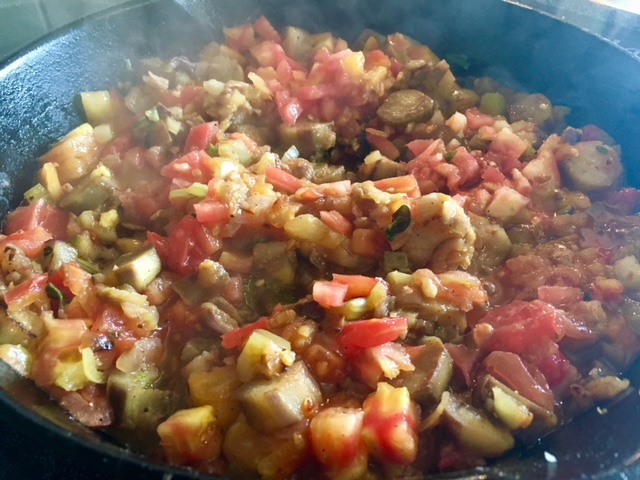
caramelization in the bottom of the pan, which adds that depth of flavor you want in caponata. I let this go for about 10 minutes, until the veggies started to stick to the pan a bit and there was a nice layer of fond developing. I added the tomatoes, 2 tablespoons of vinegar and 1 tablespoon of sugar and as I stirred, I scraped up that beautiful fond and mixed it all back in as it cooked. At this point, the whole mixture needs to cook over medium low heat for about 15 minutes to allow the tomatoes to break down, the liquid to evaporate and the flavors to concentrate.

As the caponata cooked, it filled my house with a tangy and savory aroma. After 15 minutes, the tomatoes had integrated and the veggies were soft, but the eggplant and celery still held their shapes. I added the capers, olives and the rest of the vinegar and sugar and gave it just 5 more minutes to simmer gently before removing the pan from the heat. At this point, you could add different things like raisins or pine nuts depending on your taste, but I left mine as is. Since this mixture is best served cold or at room temperature, its important that the seasoning is right. When foods are chilled, the flavors become muted, so make sure you have enough salt and pepper to account for diminished flavor when the caponata is cold. I tasted, adjusted the seasoning, added some fresh herbs and put the finished caponata in a bowl in the fridge while I toasted some sliced baguette for the big reveal.

We enjoyed our caponata as a pre-dinner snack, slathered on crispy, toasted baguette slices with a nice glass of hard apple cider. The eggplant and celery had mostly cooked down, but there were still visible chunks and the bright, briny pop of the green olives and capers whetted our appetites. The caponata sat in the fridge all week and each day when we got home from work, we'd snack on it and marvel at how much better the taste was from the day before. The longer this stuff sits in the fridge, the yummier it gets and its an excellent vehicle for showcasing the unctuous earthiness of eggplant. So next time you're looking for an unusual hors d'oeuvres, give caponata a try.


Sunday, August 26, 2018

The Hebrew Buckaroo

On Saturday morning, I got the call. It was the culinary equivalent of the bat signal from the old Batman show. Our friends and neighbors Allison and Adam had just brought their newborn daughter home from the hospital the day before. I told Adam I was planning to cook on Sunday and asked if they'd like me to bring them some sustenance. The answer was an emphatic YES! "Any special requests?", I asked. Adam replied, "Well, if you're feeling ambitious, Allison proclaims "Challah".  This looked like a job for The Hebrew Buckaroo!

Yes, I know its ridiculous, but in that moment, I kind of felt like a super hero and my challah was a secret weapon used to fight the effects of physical and psychological hunger. But why stop there, I thought, if I'm buying into this whole super hero thing, I might as well go for broke. Nothing is more nourishing, comforting or welcomed than a pot of homemade chicken soup and it just so happens that my chicken soup has super, or should I say "souper" powers. When I asked Adam if he preferred noodles or matzoh balls, you can guess what the answer was. With a plan in hand, I set off to the grocery store. The only thing missing was my cape and mask.

I've posted both of these recipes before and made hundreds of pots of chicken soup and dozens of challahs, You'll find recipes, step by step instructions and some interesting writing here:

HOMEMADE CHICKEN SOUP

HOMEMADE CHALLAH

When I got up Sunday morning, I was feeling especially powerful. About half way through my first cup of coffee, the super powers kicked in and I headed to my laboratory, eh, I mean kitchen, to begin making the soup of justice.

Since it proofs twice before being shaped, I started with the challah. I emptied a package of rapid rise yeast into a large mixing bowl, squeezed in about a tablespoon of honey and poured in half a cup of warm water to activate the yeast. While the yeast's super powers sprang to life, I moved on to the next step and put a stick of butter, half a cup of sugar and a cup of whole milk in a small saucepan over medium low heat, just to allow the butter to melt. It only takes about 5 minutes for the yeast to activate and once it was frothy, I cracked the eggs in and whisked them up a bit before stirring in the warm milk mixture. Its important that the milk is no warmer than about 100 degrees or it will kill the yeast. With all the wet ingredients combined, I added 3 cups of bread flour and started mixing. The recipe calls for 6 1/2 cups of flour, but I find 6 cups to be enough for a soft, fluffy and delightful dough. I like to mix the flour in one cup at a time until it comes together into a ball, at which point I turn it out onto my surface and start kneading. If the dough is too sticky, I just knead in more flour a handful at a time until the dough is pliable and easy to knead. After about 10 minutes of vigorous kneading, the dough was perfect and I dropped it into a greased container for its first rise of 90 minutes.

With the challah on the rise, I turned my attention to the soup. I keep a large ziplock bag in the freezer that I use to store a variety of soup fixins. When I roast a whole chicken or turkey, the bones go into the soup bag. Celery tops, old carrots and even yellow onion skins go into the soup bag. It usually contains chicken backs, necks and wingtips, veggie trimmings and even parsley or dill stems. There are a ton of nutrients and lots of flavor in what most people would toss in the garbage. In my house, it becomes soup. My soup bag was full and I added everything to my largest stock pot along with a whole 4 lb chicken, a smoked turkey wing, a couple bay leaves, a handful of parsley and dill from my garden and several garlic cloves. I added one can of chicken broth and filled the pot with cold water until the chicken was just submerged. I put the lid on the pot and turned the heat to medium low for a whole day of simmering.

The rest of my Sunday was spent finishing this good deed, deflating the challah dough and setting it in a warm place for its second rise, removing the whole chicken from the pot once it was cooked through and letting it cool so I could remove the meat and return the bones to the soup pot and getting the matzoh ball mixture ready and in the fridge to set up. It was a day of cooking filled with care, heart and spirit. My broth was rich and golden, the matzoh balls fluffy and tender and the challah was picture perfect. It was all still piping hot when we arrived at Allison and Adam's house with our special delivery. We met the newborn Sasha Alexandra and visited with our friends for a while before leaving them to their matzoh ball soup and warm challah, which turns out is Allison's favorite meal. The Hebrew Buckaroo saved the day.

So, when the evil grip of illness sneaks in or when dastardly hunger strikes, when the devastating creep of winter threatens to cast its evil shadow over all the world or when the low rumble of empty bellies cry out for nourishment, The Hebrew Buckaroo will be there with the soup of justice.


Saturday, July 14, 2018

I Can Pickle That!

Every summer, I tell myself that its the last time I'm planting cucumbers. And every summer, I find myself buried under a mountain of cucumbers. Last year I planted four cucumber plants and by the end of July I never wanted to see another cuke again. Out of necessity, I learned to make pickles and it opened my eyes to the glorious world of homemade brined vegetables. This year I was smart and planted two Kirby cucumber plants, which is a variety specifically designed for pickling. When the giant dill pickle balloon is flying over the Rachel Carson bridge in downtown Pittsburgh, welcoming people to our annual Picklesburgh festival in July, its time to kick into full pickle production mode.

So far, I've harvested at least 40 cucumbers from two plants that I started in early May. The first batch became sour pickle chips with a simple vinegar brine. This basic recipe calls for equal parts of white distilled vinegar and water, with a little salt and whatever flavorings you like. You can add garlic, peppercorns, dill seed or even dill sprigs to enhance the flavor. I also made 12 jars of bread & butter pickles based on the recipe I used last summer. Click here to read about it. But the ones I am most proud of are the fermented pickles that spent a week sitting in a bowl on my kitchen counter. This was my first attempt at fermented pickles and I am awed by how authentic they taste. 

Fermented vegetables were a staple in the diets of my eastern European Jewish ancestors. The fermentation process allows the natural sugars in the vegetables to turn into lactic acid, which creates an acidic environment that prevents the growth of bacteria that would normally cause food to spoil. Its an easy and inexpensive way to preserve foods for extended periods of time, which is great for long, harsh winters. The crunch and sharpness of brined veggies also makes an excellent counterpoint to the often bland meat & potato based diets that were common in places like Poland and Russia. When immigrants came to America from eastern Europe, they brought this tradition with them and the kosher dill pickle became a popular street food and standard fair in Jewish delicatessens. The cucumbers were washed and stacked in barrels with dill, garlic, spices, salt and clean water and left to ferment in a relatively warm place for a few weeks or even a few months. The longer they sit in the brine, the more flavorful they become. I grew up on those pickles and have vivid memories of fishing them out of the huge barrel at Tabachnick's deli. 

FERMENTED PICKLES

10 large pickling cucumbers
5 cups clean water, filtered or distilled
5 tbsp pickling salt
5 large sprigs of fresh dill or a tablespoon of dill seeds
5 cloves of garlic
About 20 black peppercorns
2 bay leaves
2 grape leaves or horseradish leaves (optional)

There is quite a bit of science behind the perfect naturally fermented pickle and they deliver health benefits that shelf-stable vinegar brined pickles do not. Fermented foods are an excellent source of probiotics, which are essential for gut health and aid in digestion as well as boosting your immune system. Fermentation helps break down cellulose in the skin and seeds of the vegetables, making them easier to digest. Because pickles are highly acidic, bad things like e.coli are unable to survive in that environment. A word of caution, however, while the ingredients and preparation are very simple, there are plenty of things that can go wrong. The more you know, the less likely you will end up with mushy or even moldy pickles. 

First, choose the right cucumber. Look for varieties that are bred specifically for pickling, like Kirby or Alibi. If you use standard slicing cucumbers, which have thinner skins and more moisture, your pickles may turn to mush. Pickling varieties are smaller, shorter, have thicker skin and less moisture, which allows them to soak up the brine more effectively. Second, make sure you use the right salt. Ordinary table salt contains iodine and other chemicals that can interfere with the fermentation process. Kosher salt will work, but pickling salt also contains an enzyme that inhibits the growth of bacteria. Make sure the salt you use does not contain iodine. Finally, the addition of tannin will help keep your pickles crisp, which is where the bay leaves, grape leaves or horseradish leaves come in. I was extremely fortunate because my husband decided to grow horseradish in the garden this year, so I was able to use a leaf in my pickles. However, horseradish leaves will probably be impossible to find, but grape leaves are available in the specialty section of your grocery store. If you can't find them, use a couple extra bay leaves. They'll help keep your pickles crunchy and add a little extra flavor. 

Fermented pickles, day 1
So that's it. Are you ready to pickle? Before you begin, wash your cukes really well in cold water and make sure you remove any remaining bits of blossom. Leave your cucumbers whole for this preparation to make sure the brine doesn't break down the flesh too quickly. Find a nice, deep bowl or large jar in which your cucumbers will fit snugly. The cucumbers need to stay completely submerged in the brine and not be exposed to any air or they'll mold. I used a deep earthenware bowl that I covered with plastic wrap, but if you have a deep bowl with a lid, that would work well. For every cup of water, use one tablespoon of salt and heat the water up slightly just to dissolve the salt more easily. Also, if your cucumbers are really cold, the warm water will help them come to room temperature more quickly. Add the salt, garlic, bay leaves, dill seed and peppercorns to the water and warm it up over low heat. In the bottom of your bowl, place a couple sprigs of dill and half of the grape leaf or horseradish leaf. Place the cucumbers in the bowl, making sure you have enough room so they will be completely submerged in the brine. Once the salt is dissolved, pour the brine over the cucumbers and put the rest of the dill and the other half of the grape or horseradish leaf on top. If the cukes float, place a small plate over them to make sure they stay below the surface of the liquid. Cover your container with plastic wrap and find a spot that's out of the way to let them ferment. The best temperature for this process is between 68 and 72 degrees, so don't let them get too cold or too hot. 

Fermented pickles, day 5
It was so difficult for me to be patient and for the first few days, I looked at my pickles a couple times a day. On the third day, I took one out of the brine and sliced it. The color had changed slightly from its original bright green to a duller, more olive color. It was starting to ferment, but still tasted mostly like a cucumber. On the fifth day, the brine began to look cloudy and little bits of foam were floating on the surface. This is a normal bi-product of fermentation and I decided to have another taste. If you've ever eaten a half-sour, you'll know what my pickle tasted like after five days in the brine. It was still quite crunchy and tasted like a cucumber, but the brine had definitely penetrated the skin and that classic deli-style pickle flavor was developing.

Fermented pickles, day 8
On the eighth day, I tasted again and this time they were perfect. Still crunchy, very briny, sour and complex, I had succeeded in fermenting my own pickles. They were soft, but not mushy and there was a pleasant tingle when I bit into the slice. They tasted exactly like the kosher dill pickle of my youth. I took the remaining seven pickles out of the bowl, put them in containers, poured the brine over them and set them in the fridge. Since the garden is still in full production, this won't be the last batch of fermented pickles I'll be making this year. I'm looking forward to sharing my briny prize with friends and family.


Sunday, July 1, 2018

First Harvest Dinner

It was a Friday night in June and we had no dinner plans. To be fair, it had been an unusually busy week with both of us working extra hours. The following day my radio station was holding our largest annual event, a big concert with six bands in a beautiful park in the middle of Pittsburgh's university district. I hadn't really been thinking about our dinner plans for the evening before Summer Music Festival. Yet there we were, sitting in the living room debating our options of mediocre Chinese take-out, a trip to the grocery store for some frozen or prepared foods or making due with what I had on hand. My husband was ambivalent.

I stood in the kitchen at about 6:30 that evening, my stomach softly rumbling, and stared into the empty abyss of the refrigerator. We had eggs, a head of cabbage and and a couple of apples. The pantry held a little more promise with a can of Italian San Marzano tomatoes and a couple boxes of pasta. Combined with good olive oil, some of the grated Parmesan cheese I unearthed from the fridge and a whole bunch of herbs from my garden, I could make a nice, light and fresh tasting tomato sauce and serve it with angel hair pasta. Voila, dinner would be served.

For a decent tomato sauce, onion and garlic are necessary ingredients, but alas, my fridge was uncharacteristically devoid of onions and I had two pathetic dried out cloves of garlic on hand. That's when my brilliant, handsome and resourceful husband chimed in with "hey, we have a whole bunch of onions and garlic growing in the garden". I seriously need to marry that guy. This is the first year we've attempted to grow onions and its early in the season. The garlic had just put out their shoots a few weeks prior, so we figured they'd be underdeveloped. Gloves and trowel in hand, I ventured out to see if I could harvest enough goodies to make this sauce happen. I pulled up two small onions and a puny garlic bulb, but also decided to harvest the one fairly large Japanese eggplant we had in the garden. With veggies procured, combined with handfuls of fresh basil, oregano and parsley, I was ready to go to work.

TOMATO SAUCE WITH EGGPLANT

1 12 oz. can good quality whole peeled Italian tomatoes
1 cup chopped fresh eggplant
1/2 cup finely chopped onion
1 tbsp minced garlic
2 tbsp olive oil
1/4 cup each chopped fresh basil, parsley and oregano
Salt, black pepper and red pepper flakes to taste

Honestly, this sauce is so easy I'm embarrassed to write a blog about it. But there are some fine points that will help you make the very best dinner you can out of these sparse but flavorful ingredients. Normally, when garlic has reached maturity and the bulbs are big and fat, they are harvested and left to dry for a few weeks until the skin become papery and garlic has mellowed. I didn't have that luxury and fresh garlic is extremely assertive. The bulb I dug up was only about the size of a hazelnut, but it stunk up the whole kitchen, so I used half of it. Before starting the sauce, I put a large pot filled with water over medium high heat and added several tablespoons of salt for my pasta. In a medium saucepan, I sauteed the chopped onion with some olive oil, salt, pepper and red pepper flakes just until it was translucent before adding the garlic. While that sauteed, I opened the can of tomatoes and lifted each tomato out of the can into a bowl, leaving the liquid in the can, and I crushed up the tomatoes by hand until all the big pieces were mostly broken down.

Once the garlic and onions began to brown, I added the sliced eggplant and another splash of olive oil and let that cook until the eggplant began to soften, then I added the tomatoes and just a splash of the tomato liquid, turned the heat down to medium low and let it gently simmer for about 15 minutes. I came back and tasted, added a pinch more salt and pepper, a little more tomato liquid and half of the fresh herbs. After 15 minutes, I dropped the pasta into the boiling water and cooked it until it was still a little chewy, about 8 minutes. Before I drained the pasta, I scooped out a cup of the pasta water to loosen the sauce. When you drain your pasta, for goodness sake, don't rinse it!!  Pasta has a thin layer of starch on the outside that allows the sauce to penetrate and stick to it. I drained the pasta into a colander, dumped it back into the pot and scooped the sauce on top. The pasta will taste better if you let it finish cooking in the sauce, so I added about half of the pasta water and put it over medium heat to finish cooking. It only took about 6 minutes for the pasta to absorb the liquid in the sauce and take on its beautiful flavors. Before serving it, I added the rest of the fresh herbs, stirred it all together and admired my work.

We enjoyed our dinner with a little of that grated Parmesan cheese on the top and a glass of chilled sauvignon blanc. It was delicious! The red pepper flakes brought just a little heat and the sauce was sweet, mellow and surprisingly complex. With just a few ingredients and a little imagination, I'd managed to pull a really lovely, light and flavorful dinner out of thin air, thanks to my garden. Even though its early in the season and the garden has just begun to produce, its such a satisfying feeling to cook with the stuff you grow yourself.