Saturday, March 24, 2018

A Pile of Pierogies


Last month at our inaugural Bitchin' In The Kitchen gathering, a group of 5 bawdy women in our 50's made challah, drank wine and laughed our asses off at my house. As we shared ideas about the second meet-up, Suzanne offered to host and suggested we make pierogies. Who doesn't love pierogies?! We all jumped at the chance to roll some dough, enjoy an adult beverage and eat freshly made pierogies with a group of fantastic women.

Pierogi is the national dish of Poland and is somewhat of a generic term for a filled dumpling. They can be filled with ground meat, sauerkraut, the classic potato & cheese combo or even fruit for a tasty little dessert or afternoon snack. The origin of this dish is unclear, but its been around since at least the 1200's and it's called by many different different names in eastern European cultures. They show up on Slovakian, Hungarian, Romanian, Russian and German tables, but they are such an important and beloved part of Polish culture that every holiday has its own type of pierogi. Pittsburgh has had a love affair with the pierogi since the Industrial Revolution, when a huge eastern European workforce brought their traditions to the region. Pierogies are so popular here that in the 5th inning break of Pittsburgh Pirates games, people dressed in giant pierogi costumes race each other around the outfield. I usually root for Jalapeno Hannah.


PIEROGIES


For the dough

3 c all purpose flour
1 tsp salt (1 tsp garlic salt optional)
3/4 c melted butter
3/4 c water
1 egg

For the filling

2 lbs Russet potatoes
2 c grated sharp cheddar cheese
1 medium onion, chopped and caramelized in butter
Salt and pepper to taste

Making pierogies from scratch is a real commitment. This is not something you whip up 
on a weeknight when you get home from work. These dumplings were traditionally made by large groups of women for big gatherings like weddings and holidays. Depending on the size of the cutter, this recipe makes 40 to 50 periogies, which is enough to serve about six people. Its hardly worth the effort for a few portions and since there were four of us bitchin' in the kitchen, Suzanne was prepared for a large scale production.


Using a couple of different recipes for guidance, Suzanne, Lynn and Marie had boiled six pounds of potatoes, letting them cool slightly before mixing in four cups of grated cheese, two large sauteed onions and salt and pepper in the stand mixer. While the filling cooled, they made small batches of two different dough recipes - one with egg and one without. I arrived a couple hours late and when I walked in the door, they handed me a matching apron, a delicious adult beverage and a small plate with two pierogies on it, one from each batch of dough. With just a little bit of salt and butter, they were both delicious and I wanted to eat 7 more, but we had work to do. The dough with the egg in it had a pleasant toothsome texture while the eggless dough was slightly gummy. We all agreed that the dough with egg was superior in taste and texture, so Suzanne started making a second batch of dough. Pierogie production had begun! 

To make the dough, Suzanne put the water and butter in a small pot on the stove and gently heated them until the butter melted. She put the flour and seasoning in the bowl of the stand mixer and using the dough hook, she blended in the water until the dough started to come together. Finally, she added the egg and kneaded the dough until it had a slightly sticky, slightly elastic texture and felt almost like a pasta dough, which took about 5 minutes.


We set up an assembly line with Suzanne rolling the dough very thinly and cutting it into rounds. She didn't have a pastry or biscuit cutter, so she was using a cocktail shaker to cut the dough. Lynn filled each round with a couple tablespoons of filling, Marie dampened the edges of the dough with a little water and sealed each pierogie and I was at the end of the line with a fork crimping the edges and filling tray after tray with beautiful, handmade dumplings. After four hours, we'd made 5 batches of dough and ended up with about 250 pierogies.


Finally, Suzanne boiled some water while Marie sauteed onions in butter until they were a deep, golden brown. Suzanne dropped a dozen pierogies into the pot and boiled them just until they floated. Using a slotted spoon, she fished them out and dropped them into the pan with the onions and added another generous nub of butter. Our reward was at hand and we sampled our handiwork with a great sense of pride. My oh my, those little pillows of joy were tender and chewy and just delightful and we each took home an enormous ziplock bag of pierogies. To freeze these little beauties, lay them out on a sheet tray covered with a piece of parchment paper or waxed paper and place the tray in the freezer for about half an hour. Once the pierogies are frozen they can be put in bags and kept for months in the freezer.  It looks like our next Bitchin' in the Kitchen gathering will take place at Lynn's house and she's planning to have us make ravioli, the Italian version of pierogies, another large scale production. I sense a pattern developing here. 


Sunday, March 11, 2018

My Favorite Store Is Closing

My favorite grocery store in Pittsburgh is closing its doors. After more than 70 years in the business, family owned McGinnis Sisters will cease operations as soon as their inventory is gone. I made one last trip a few days after the announcement and it was a really emotional experience. The folks I'd relied on for fresh fish, locally raised meats and produce and a kick-ass bakery were packing it up and preparing to walk away from a community institution. The produce guy commiserated with me and made some suggestions for where I might find the same kind of quality items that McGinnis Sisters stocks. A woman in the deli expressed her fears to me about finding a new job after working there for 42 years. The guys at the meat counter who saw me every couple of weeks were too sad to even meet my gaze, let alone engage in small talk. As I walked past the empty produce bins, empty fish counter and abandoned bakery, I thought a lot about why I love this grocery store so much and what is has in common with the other small, family-owned stored I've loved in the past.

When I lived in Texas, small, family owned stores were a little harder to find, but in its early years Whole Foods, which started in Austin, Texas, very much fit the bill for me in terms of selection and quality. I lived in Philadelphia for a year and was pleased to find small grocery stores and food co-ops everywhere. The Italian market in my neighborhood had incredible meats, cheeses and specialty items. When we moved to New Hampshire, the closest Whole Foods and the wonderful Lebanon food co-op were an hour away and I'd make the trip every couple of months, but my weekly food shopping always included a stop at Quality Cash for meat. It was owned by a guy who'd spent 20 years working for large grocery chains and he made the commitment to carry the very best quality chicken, lamb, beef and smoked meats from small producers in the region. When I found McGinnis Sister shortly after moving to Pittsburgh, it felt just as familiar and welcoming as the places I'd loved before.   

There are a set of characteristics that, for me, define a great food store. Some of them are obvious, such as the ability to stock local products and keen attention to quality, but there are other things that combine to make for a pleasant grocery experience. How the store is laid out, how the inventory is displayed, how things are priced and how much is made and/or packed in-house are all important considerations. My favorite small grocery stores all have their unique specialties. The Italian market I loved in Philadelphia had outstanding meats with a great selection of exotic cuts like fresh duck breasts and veal shank. They had a small but excellent deli and a small produce section with enough to make a nice salad or fresh green side dish. Quality Cash focused much of their attention on their chicken, meats and lunch counter. Their chicken came from a specific producer in Salisbury, MD and was air chilled, never frozen and was the best tasting chicken I've ever prepared. They carried extremely good beef and lamb, some raised locally and some from other producers in the region, and their lunch business was very active with an in-house kitchen that served pulled pork, fried chicken, sausage sandwiches and lovely breakfast sandwiches. I've also shopped at a wonderful family owned Italian market here in Pittsburgh called Labriola's, which has awesome imported deli meats, sausages, really good prepared classic Italian dishes and all the imported pasta, canned tomato products and olive oil your little heart could desire. These places are all modest businesses, occupying maybe 3000 square feet in a small shopping center or in a stand-alone building no bigger than a large single family home. These are the kinds of places that are crowded when 20 or 30 customers are shopping at once.

McGinnis Sisters locations were more the size of small supermarkets at maybe 10,000 square feet, but in many ways had the same vibe as my favorite small stores. Much of their seasonal produce had signs indicating which farm or town they came from. Their selection of apples was second to none and when they were in peak season, I would walk out with varieties such as Stayman, Idared or ginger gold, all grown within a 100 mile radius. Not all of their produce was local, but there was enough of it to make me happy. The same was true for their meat department with beef, chicken, turkey and pork all coming from regional producers and for not much more money than I'd spend at a big box supermarket, I regularly stocked up on fresh ground beef, pork tenderloins and the very best chicken wings I've ever cooked. Every Friday, the fish department received fresh Alaskan salmon, Atlantic cod or scallops from New England. Its the only place I've ever found fresh skate wing. McGinnis Sisters bakery featured the most scrumptious pepperoni rolls, small loaves of ciabatta and sourdough bread and amazing pastries, cookies, pies and cakes, all made right in plain site of the general public. They also had a nice cheese case and a good selection of fresh eggs, Amish butter and local dairy products. When it came to general staples, dry goods and pantry items, McGinnis Sister honored the European roots of the population and the shelves were graced with exotic types of mustard, condiments, jams and canned goods, plus a small but mighty selection of chocolates and sweets that beckoned as I stood in line at the register. It wasn't a huge store, but it was big enough to stock an interesting variety of stuff and no matter how many times I've shopped there, something unique usually caught my eye.

While there are advantages to shopping at smaller local chains and mom & pop stores, there are drawbacks. Many of them don't carry everything on your grocery list or if they do, the prices are unreasonable. I can't buy toothpaste, cleaning supplies or cat litter at most of my favorites places, so I do end up making several stops on my weekly run for supplies. I certainly spend more money when I make multiple stops and while I found McGinnis Sisters produce and meats to be priced competitively, a lot of their other items were much higher than they are at the big chains. That said, I'm willing to make that choice so I can feel good about what I'm putting in my body and where I spend my money on the foodstuffs I desire. However, I realize this lifestyle isn't for everyone. During a recent conversation with some of my colleagues, it was surprising to discover how many people despise their regular trips to the supermarket. They were raving about the convenience of ordering online and having someone bring their haul right to their car or even just shipped directly to their house. The world has changed and it has become increasingly more difficult for small businesses to compete in the everything-at-your-fingertips marketplace we live in. The personal touch isn't as valued as it once was.

Ultimately, that's what I will miss most about McGinnis Sisters - the people. The guy who ran the fish counter never steered me wrong, I was always pleased with his recommendations, even his advice on cooking methods. The guys in the meat department and the women in the bakery were always kind and attentive. The checkers were pleasant and engaged. I never saw employees standing around playing with their phones or chattering with each other as if the customers didn't exist. They were genuinely happy to serve me. They cared. They cared enough about their customers to be responsive, to give them the very best and to regard their own business as an integral part of the communities they served. I get it, I really do. The profit margins in the grocery business are quite thin and overhead is high. McGinnis Sisters had three locations and about 100 employees. But it still hurts to lose this beloved business and my sadness is nothing compared to those 100 people and the family who was no longer able to sustain a business that nourished a community for more than 70 years. I'll find other places to fill the food void, but McGinnis Sisters will always occupy a special place in my heart.

Sunday, February 11, 2018

Wontons & Dumplings

Sometimes meal planning can be an enormous challenge, especially when we are watching our calories and a lot of our favorite fresh produce is mostly out of season. We are sick to death of boring salads and boneless, skinless chicken. In my continuing efforts to cook lighter dishes without sacrificing on flavor, I decided to take an Asian route and make some soup with lots of vegetables and wontons. I had a bunch of odds and ends in the freezer ready to be made into a healthy broth and I also had pork chops and shrimp. All I needed was veggies and wonton skins.

Wontons are one of the most popular and oldest types of dumplings in Chinese cuisine. There are hundreds of types of dumplings filled with many combinations of meat, poultry, seafood and vegetables, but wontons have been enjoyed all over Asia for 1,000 years. Wontons vary in shape, flavors and serving methods from region to region. For instance, Cantonese style wontons have an irregular shape and are served in noodle soup while Sichuan wontons are triangular and are dressed with chili oil. They are not terribly difficult to make and the ingredients are easy to find.

PORK AND SHRIMP WONTONS

1/2 lb pork, moderately fatty
1/2 lb cleaned and peeled raw shrimp
1 tbsp soy sauce
1 tbsp fresh ginger, minced or grated
1 minced garlic clove
1 tbsp sweet Chinese rice wine, such as Mirin
1 tsp sugar
1/2 cup chopped scallions, white and green portions
salt & pepper to taste
1 package wonton skins

The day before I made wontons, I made a big pot of stock from the chicken bones and veggie remnants that were in my freezer. To give it an Asian flavor, I added a couple nubs of fresh ginger and a bunch of scallion tops while it was simmering. Before I started making wontons, I took the stock out of the fridge, put it in a big pot on the stove and added some shredded Napa cabbage, bok choy greens, thinly sliced carrots and celery and some snow peas, just so the veggies could begin to cook in the broth. Then I turned my attention to the little bundles of deliciousness.

Wonton filling should be juicy and firm inside its wrapper. If the pork is too lean, the wonton filling will be dry and crumbly. Ground pork is fine for this recipe, but it should be 80% lean. However, I like a little more chunky texture to my wonton filling and I figured I could also make some dumplings with the same filling and steam or fry them. Therefore, I decided to use a Porterhouse cut pork chop that had some fat along the edges and a nice section of tenderloin on one side of the bone. Making sure to save all the fat, I cut the meat off the bone of my pork chop and cut it into large chunks, which I put in the bowl of my food processor fitted with the metal blade attachment. I also peeled and de-veined the shrimp, cut them in half and added them to the pork.

When I cook, nothing goes to waste and since I had a pork bone and a bunch of shrimp shells, I decided to make a quick broth that I could add to the soup for an extra punch of flavor. I put the shells and pork bone into a small pot with a chopped green onion, a nub of ginger and a garlic clove and turned the burner to medium high. I sauteed the shells briefly before adding water and turning the heat to low. This small pot slowly simmered away while I made the wontons.

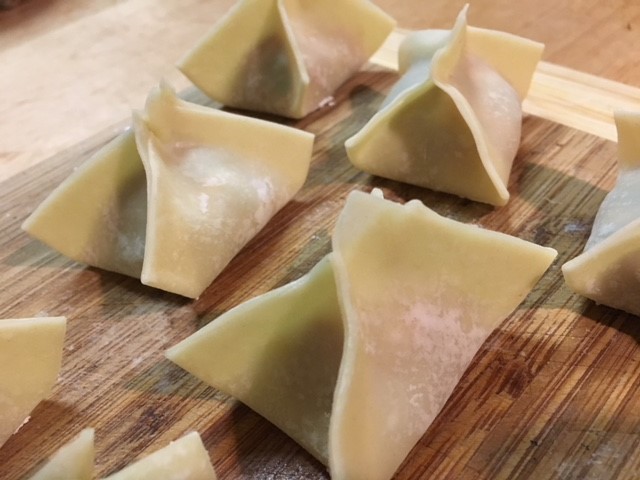
I planned to just finish making the filling entirely in the food processor, but I also didn't want to pulverize the pork and shrimp and lose that toothsome texture I was going for. Before adding the rest of the ingredients, I pulsed the food processor three or four times to roughly chop the pork and shrimp. I measured the rest of the ingredients right on top of the meat and pulsed a few more times to make sure everything was well incorporated, then scooped the filling out into a bowl. Before assembly, I set up a wonton making station with a small bowl of water, small pile of wonton wrappers, some filling and a plate with a thin dusting of corn starch on it to keep the wontons from sticking. One at a time, I put a small blob of filling in the middle of each wrapper, moistened all the edges with a tiny bit of water, then brought the corners of the wrapper up to make a little bundle. Its important to squeeze out any air as the wontons get sealed to prevent them from exploding while they cook. I pressed the moistened edges of the wrapper together to make sure it was well sealed before moving on to the next wonton.

I got about 10 wontons made, which was enough for dinner, then put the rest of the filling in the freezer. I took the wrappers out of their plastic container, wrapped them in a slightly damp paper towel, slipped them into a sandwich bag and put them in the freezer with the filling. By the time I was done making wontons, my broth was simmering gently, so I strained the broth I'd made from the shrimp shells into the pot, dropped the wontons in and let them cook gently until they floated, which only took about 5 minutes. The soup was fantastic with the veggies still kind of firm and the wonderful flavors of shrimp, pork and ginger in the wontons. The filling had that meaty chew that I was hoping for and it was a healthy and satisfying meal for a cold Sunday night.

As the weekend approached, I moved the filling and wrappers from the freezer to the fridge in anticipation of making dumplings by the following weekend. By the end of the week all the soup was gone and when I got home from work on Friday evening, I took the filling and wrappers out of the fridge.


I wanted to see how these dumplings performed both steamed and fried, so opted to steam half the dumplings and fry the other half. I put about an inch of water in a large pot, put my steamer basket in the bottom and laid several cabbage leaves on the steamer to keep the dumplings from sticking. In a small pot, I put about two inches of vegetable oil and turned both burners to medium high. As I was making the dumplings, I tried a few different shapes. For the steamed dumplings, I pinched the corners of the wrapper, then wrapped them around the side, leaving the filling exposed. For the fried dumplings, I made triangles, little bundles and tiny little cylinders that looked like mini egg rolls. I put the open-top dumplings on the steamer basked and put a lid on the pot. Two by two, I fried the other dumplings in the hot oil until they were crispy and dark brown. We enjoyed our dumplings with a little soy, hoisin sauce and sriracha. And they were a wonderful, tasty Friday night treat. There are lots of different types of fillings and cooking methods to experiment with, but this filling is a great all-purpose wonton and dumpling mixture that I know I'll make again and again.


Monday, February 5, 2018

Holla for Challah

I kind of love how inspiration travels and spreads like a weed. One of my very favorite food writers Kathy Gunst published a book in 2016 called Soup Swap and my husband gave it to me as a holiday gift that year. It inspired me to do my own soup swap with my neighbors just a few months later. Kathy's soup swap was born during a harsh winter in Maine as a way for her and her friends to stay sane in the darkest, most frigid days of a long season. They found comfort, creativity and togetherness in bowls of soup. In the midst of a very grey, snowy and dark winter in Pittsburgh, Kathy inspired me yet again! I posed an idea to some friends over drinks recently that we get together once a month and make something, whatever it is that we enjoy making. Marie makes really delicious pickles, Suzanne is an expert cookie baker, Lynn makes amazing ravioli and my bread-making skills are pretty sharp. The more we talked about the varied and interesting culinary skills we all have, the more this idea started to take shape. We are also a bunch of bawdy women who can't resist a glass of wine, a dirty joke and rousing game of Cards Against Humanity. This is how "Bitchin in the Kitchen" got started.

We decided to start small with a group of 6 women, so I invited them all over to my house to teach everyone how to make challah - my absolute favorite go-to homemade bread. For novice bread bakers, this is a perfect recipe for teaching. Its relatively simple and only takes about four hours from beginning to end. Its a really soft dough that can be made without a stand mixer. Its a braided loaf, so there is an opportunity to learn some good technique and its also visually stunning, which leaves people with a sense of accomplishment when they're done. Since I've posted this recipe before, I'll just ask you to CLICK HERE if you're interested in making your own challah.

Lynn, Suzanne and I making dough
One person was unable to attend, so there were 5 of us baking challah in my kitchen. Normally, one recipe makes two large or three small loaves of bread, so I figured if we doubled the recipe we'd end up with six loaves - one to eat right away and one for each person to take home. Instead of combining them into a single batch of dough, we made two separate batches so everyone would have a turn to get their hands in the dough and knead. We all gathered in the kitchen, put on our aprons and assumed our roles. I started the yeast with warm water and honey in two separate mixing bowls while Marie read the proportions of ingredients out loud from my Baking with Julia cookbook. I put two pots on the stove and gently heated the milk, butter, sugar and salt until everything was melted and dissolved. Lynn and Suzanne each took a bowl and broke the eggs into the yeast, stirring to combine, then I poured the warm milk & butter mixture in and added three cups of King Arthur bread flour to each bowl while Suzanne and Lynn stirred. As the dough came together, we added flour gradually until the dough could be turned out onto the work surface and kneaded. Once Nancy arrived, we all got our hands dirty and took turns kneading the dough and as we made this beautiful dough, I talked about texture and feel and how to know when the dough is ready for its first rise. And of course, we drank wine, which lead to silliness and lots of laughter.
The kneading

When the dough was smooth and soft, we put it into two separate containers to rise and spent the next hour and a half playing games and howling with laughter. We took a break to deflate the dough and give it its second rise, then went back for more games , wine and hilarity. Finally, it was time to shape the dough. We turned it out onto the work surface and I cut it into three pieces each, then into smaller pieces for braiding. I showed everyone how to shape the dough and they all did a really terrific job. We ended up with four braided loaves and two twisted, round loaves. We set them aside for their final rise of about 30 minutes and turned the oven on to 375 degrees.

And there was much laughter
Just before baking, we brushed each loaf with an egg wash and sprinkled them with salt and seeds. During the 35 minute baking time, we hung out in the kitchen, cleaned up a little bit and talked about our day and what we learned. I rotated the pans a couple times and reglazed as the loaves as they expanded in the oven. When the challah was done, we stood in the kitchen and admired our work, but I can never wait until the bread is completely cool to cut into it. I chose a loaf and sliced it while it was still quite warm. The best part of the day for me was watching everyone's faces as they took that first bite of buttery, fluffy warm challah. It really is a moment of pure delight and half that challah was gone before we knew it. Everyone brought a challah home and they took my advice and made french toast out of it. So, we all had a ridiculous amount of fun, learned how to make bread and bonded over a shared experience. I ask you, what better way is there to spend a cold, winter day? We will be Bitchin in the Kitchen again next month, this time at Suzanne's house to learn how to make pierogies. I can't wait!!


Sunday, January 28, 2018

The Best Honey Cake

Sometimes inspiration can surprise you just at the right moment. I was hanging around the house last night relaxing after a Saturday morning at work. I'd started making a list for my weekly Sunday grocery run and as I considered what I wanted to cook for Sunday dinner, my phone buzzed to let me know I had an instant message. It was my friend Sue Wasserman who lives in Asheville, NC. Now, its not unusual to get a random message from a far away friend, but I have not seen or spoken to Sue since I was 16 years old. We grew up together in White Meadow Lake, NJ, a small predominantly Jewish community about an hour east of New York City. My family relocated to far southeast Texas just weeks after my 16th birthday and by the time I got to college, I'd lost touch with all my Jersey friends. But thanks to social media, we've all reconnected and gotten to virtually know each other as adults. I am a big fan of Sue's photography and her abundant joy and she's a fan of this blog.

Sue just moved in to a new place and as she was unpacking she came across a loaf pan, which triggered a flashback to the honey cake she ate as a kid. She was sure I'd have a recipe, which I didn't, but I believe life puts up guideposts to help us find our way when we are uncertain. It was as if Sue somehow knew I was looking for inspiration and inadvertently gave me exactly what I was looking for - a challenge to make something I'd never made before. 

Honey cake was a familiar dish for all of us Jewish kids growing up in New Jersey. Its traditionally served at Rosh Hashana, the Jewish new year, in the hopes for a sweet year to come. The recipe dates back to the middle ages when European travelers brought the recipe home from Egypt and the holy land. Because it is based on such an old recipe, the honey cake I remember tended to be dense, dry and heavily spiced. There was always a honey cake on the table at Rosh Hashana, but only the old people ate it. Sue inspired me to see if I could make a moist, light and flavorful honey cake that didn't taste like it was made in the 1300's.

HONEY CAKE

3 1/2 cups all purpose flour
1 tbsp baking powder
1 tsp baking soda
1/2 tsp salt
1 cup vegetable oil 
1 cup good quality honey
1 cup strong coffee or tea
1 1/2 cups sugar
1/2 cup light brown sugar
3 large eggs
1/2 cup orange juice
1 tsp vanilla
1 tsp ground cinnamon
1 tsp ground ginger
zest from one orange and one lemon
1/2 cup sliced almonds

As these projects go, I started by doing a bunch of research and quickly found Two Lazy Gourmets. When I read Juliana's honey cake recipe with its crunchy exterior and moist crumb, I understood what good honey cake was supposed to be. The same proportions and ingredients turned up in just about every other recipe I found with the exception of the spices. Most recipes call for clove and allspice, which just has too much of a pumpkin pie flavor, and Two Lazy Gourmets omitted the spices all together. My variation features the flavors I like most with honey - cinnamon, ginger and citrus zest.  

I have an unusually large collection of jars of honey in my pantry right now. For Christmas, I received a generous basket of local goodies including a big jar of honey from Aunt Sandy who lives just outside of Philadelphia. I also had a jar of rosemary infused artisanal honey from a local producer called Apoidea Apiary right here in Pittsburgh. It turned out both of them were made from knotweed also called Japanese red bamboo, which produces a dark honey with a mild taste. This recipe allowed me to showcase these beautiful local honeys and make them the star of the show. 

This may be the easiest cake I've ever made. This recipe makes 3 loaves or one large round cake. I opted for loaves and sprayed my loaf pans with cooking spray, then set my oven to 350 degrees. I measured out my dry ingredients into the bowl of the stand mixer. Then I basically just dumped the rest of the ingredients into bowl and using the paddle attachment, I mixed it all on low speed until it was smooth and all the lumps were gone, which only took a couple of minutes. I divided the loose batter between the three pans, sprinkled the top of each one with a generous handful of sliced almonds and popped them into the oven.

Forty five minutes later, I removed three deeply browned, shiny honey cakes from the oven and set them aside to cool for at least fifteen minutes before removing them from the pans. They took a little loosening with an offset spatula to get them to release from the pan. I let them cool on a rack for about 2 hours before I tried a slice. Sure enough, the cake was very moist and the crumb was tight but fluffy, almost bread-like in texture. The honey was the predominant flavor with hints of lemon and orange in the background. The exterior had a pleasant chewiness and the almonds brought delightful crunch to the party. Because it is full of honey which is a natural preservative, this cake can last for weeks and the final slice will taste just as good as the first. Serve it with a little whipped cream, marinated fruit or even vanilla ice cream if you want to gild the lily. Or you can just enjoy a slice with a cup of coffee or tea. If you think honey cake is the Jewish version of fruitcake, more appreciated for its cultural connection than its flavor, this recipe will change your mind.