Sunday, February 11, 2018

Wontons & Dumplings

Sometimes meal planning can be an enormous challenge, especially when we are watching our calories and a lot of our favorite fresh produce is mostly out of season. We are sick to death of boring salads and boneless, skinless chicken. In my continuing efforts to cook lighter dishes without sacrificing on flavor, I decided to take an Asian route and make some soup with lots of vegetables and wontons. I had a bunch of odds and ends in the freezer ready to be made into a healthy broth and I also had pork chops and shrimp. All I needed was veggies and wonton skins.

Wontons are one of the most popular and oldest types of dumplings in Chinese cuisine. There are hundreds of types of dumplings filled with many combinations of meat, poultry, seafood and vegetables, but wontons have been enjoyed all over Asia for 1,000 years. Wontons vary in shape, flavors and serving methods from region to region. For instance, Cantonese style wontons have an irregular shape and are served in noodle soup while Sichuan wontons are triangular and are dressed with chili oil. They are not terribly difficult to make and the ingredients are easy to find.

PORK AND SHRIMP WONTONS

1/2 lb pork, moderately fatty
1/2 lb cleaned and peeled raw shrimp
1 tbsp soy sauce
1 tbsp fresh ginger, minced or grated
1 minced garlic clove
1 tbsp sweet Chinese rice wine, such as Mirin
1 tsp sugar
1/2 cup chopped scallions, white and green portions
salt & pepper to taste
1 package wonton skins

The day before I made wontons, I made a big pot of stock from the chicken bones and veggie remnants that were in my freezer. To give it an Asian flavor, I added a couple nubs of fresh ginger and a bunch of scallion tops while it was simmering. Before I started making wontons, I took the stock out of the fridge, put it in a big pot on the stove and added some shredded Napa cabbage, bok choy greens, thinly sliced carrots and celery and some snow peas, just so the veggies could begin to cook in the broth. Then I turned my attention to the little bundles of deliciousness.

Wonton filling should be juicy and firm inside its wrapper. If the pork is too lean, the wonton filling will be dry and crumbly. Ground pork is fine for this recipe, but it should be 80% lean. However, I like a little more chunky texture to my wonton filling and I figured I could also make some dumplings with the same filling and steam or fry them. Therefore, I decided to use a Porterhouse cut pork chop that had some fat along the edges and a nice section of tenderloin on one side of the bone. Making sure to save all the fat, I cut the meat off the bone of my pork chop and cut it into large chunks, which I put in the bowl of my food processor fitted with the metal blade attachment. I also peeled and de-veined the shrimp, cut them in half and added them to the pork.

When I cook, nothing goes to waste and since I had a pork bone and a bunch of shrimp shells, I decided to make a quick broth that I could add to the soup for an extra punch of flavor. I put the shells and pork bone into a small pot with a chopped green onion, a nub of ginger and a garlic clove and turned the burner to medium high. I sauteed the shells briefly before adding water and turning the heat to low. This small pot slowly simmered away while I made the wontons.

I planned to just finish making the filling entirely in the food processor, but I also didn't want to pulverize the pork and shrimp and lose that toothsome texture I was going for. Before adding the rest of the ingredients, I pulsed the food processor three or four times to roughly chop the pork and shrimp. I measured the rest of the ingredients right on top of the meat and pulsed a few more times to make sure everything was well incorporated, then scooped the filling out into a bowl. Before assembly, I set up a wonton making station with a small bowl of water, small pile of wonton wrappers, some filling and a plate with a thin dusting of corn starch on it to keep the wontons from sticking. One at a time, I put a small blob of filling in the middle of each wrapper, moistened all the edges with a tiny bit of water, then brought the corners of the wrapper up to make a little bundle. Its important to squeeze out any air as the wontons get sealed to prevent them from exploding while they cook. I pressed the moistened edges of the wrapper together to make sure it was well sealed before moving on to the next wonton.

I got about 10 wontons made, which was enough for dinner, then put the rest of the filling in the freezer. I took the wrappers out of their plastic container, wrapped them in a slightly damp paper towel, slipped them into a sandwich bag and put them in the freezer with the filling. By the time I was done making wontons, my broth was simmering gently, so I strained the broth I'd made from the shrimp shells into the pot, dropped the wontons in and let them cook gently until they floated, which only took about 5 minutes. The soup was fantastic with the veggies still kind of firm and the wonderful flavors of shrimp, pork and ginger in the wontons. The filling had that meaty chew that I was hoping for and it was a healthy and satisfying meal for a cold Sunday night.

As the weekend approached, I moved the filling and wrappers from the freezer to the fridge in anticipation of making dumplings by the following weekend. By the end of the week all the soup was gone and when I got home from work on Friday evening, I took the filling and wrappers out of the fridge.


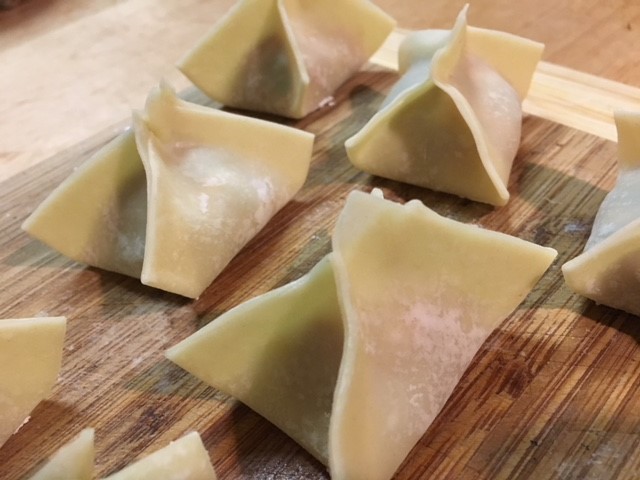
I wanted to see how these dumplings performed both steamed and fried, so opted to steam half the dumplings and fry the other half. I put about an inch of water in a large pot, put my steamer basket in the bottom and laid several cabbage leaves on the steamer to keep the dumplings from sticking. In a small pot, I put about two inches of vegetable oil and turned both burners to medium high. As I was making the dumplings, I tried a few different shapes. For the steamed dumplings, I pinched the corners of the wrapper, then wrapped them around the side, leaving the filling exposed. For the fried dumplings, I made triangles, little bundles and tiny little cylinders that looked like mini egg rolls. I put the open-top dumplings on the steamer basked and put a lid on the pot. Two by two, I fried the other dumplings in the hot oil until they were crispy and dark brown. We enjoyed our dumplings with a little soy, hoisin sauce and sriracha. And they were a wonderful, tasty Friday night treat. There are lots of different types of fillings and cooking methods to experiment with, but this filling is a great all-purpose wonton and dumpling mixture that I know I'll make again and again.


Monday, February 5, 2018

Holla for Challah

I kind of love how inspiration travels and spreads like a weed. One of my very favorite food writers Kathy Gunst published a book in 2016 called Soup Swap and my husband gave it to me as a holiday gift that year. It inspired me to do my own soup swap with my neighbors just a few months later. Kathy's soup swap was born during a harsh winter in Maine as a way for her and her friends to stay sane in the darkest, most frigid days of a long season. They found comfort, creativity and togetherness in bowls of soup. In the midst of a very grey, snowy and dark winter in Pittsburgh, Kathy inspired me yet again! I posed an idea to some friends over drinks recently that we get together once a month and make something, whatever it is that we enjoy making. Marie makes really delicious pickles, Suzanne is an expert cookie baker, Lynn makes amazing ravioli and my bread-making skills are pretty sharp. The more we talked about the varied and interesting culinary skills we all have, the more this idea started to take shape. We are also a bunch of bawdy women who can't resist a glass of wine, a dirty joke and rousing game of Cards Against Humanity. This is how "Bitchin in the Kitchen" got started.

We decided to start small with a group of 6 women, so I invited them all over to my house to teach everyone how to make challah - my absolute favorite go-to homemade bread. For novice bread bakers, this is a perfect recipe for teaching. Its relatively simple and only takes about four hours from beginning to end. Its a really soft dough that can be made without a stand mixer. Its a braided loaf, so there is an opportunity to learn some good technique and its also visually stunning, which leaves people with a sense of accomplishment when they're done. Since I've posted this recipe before, I'll just ask you to CLICK HERE if you're interested in making your own challah.

Lynn, Suzanne and I making dough
One person was unable to attend, so there were 5 of us baking challah in my kitchen. Normally, one recipe makes two large or three small loaves of bread, so I figured if we doubled the recipe we'd end up with six loaves - one to eat right away and one for each person to take home. Instead of combining them into a single batch of dough, we made two separate batches so everyone would have a turn to get their hands in the dough and knead. We all gathered in the kitchen, put on our aprons and assumed our roles. I started the yeast with warm water and honey in two separate mixing bowls while Marie read the proportions of ingredients out loud from my Baking with Julia cookbook. I put two pots on the stove and gently heated the milk, butter, sugar and salt until everything was melted and dissolved. Lynn and Suzanne each took a bowl and broke the eggs into the yeast, stirring to combine, then I poured the warm milk & butter mixture in and added three cups of King Arthur bread flour to each bowl while Suzanne and Lynn stirred. As the dough came together, we added flour gradually until the dough could be turned out onto the work surface and kneaded. Once Nancy arrived, we all got our hands dirty and took turns kneading the dough and as we made this beautiful dough, I talked about texture and feel and how to know when the dough is ready for its first rise. And of course, we drank wine, which lead to silliness and lots of laughter.
The kneading

When the dough was smooth and soft, we put it into two separate containers to rise and spent the next hour and a half playing games and howling with laughter. We took a break to deflate the dough and give it its second rise, then went back for more games , wine and hilarity. Finally, it was time to shape the dough. We turned it out onto the work surface and I cut it into three pieces each, then into smaller pieces for braiding. I showed everyone how to shape the dough and they all did a really terrific job. We ended up with four braided loaves and two twisted, round loaves. We set them aside for their final rise of about 30 minutes and turned the oven on to 375 degrees.

And there was much laughter
Just before baking, we brushed each loaf with an egg wash and sprinkled them with salt and seeds. During the 35 minute baking time, we hung out in the kitchen, cleaned up a little bit and talked about our day and what we learned. I rotated the pans a couple times and reglazed as the loaves as they expanded in the oven. When the challah was done, we stood in the kitchen and admired our work, but I can never wait until the bread is completely cool to cut into it. I chose a loaf and sliced it while it was still quite warm. The best part of the day for me was watching everyone's faces as they took that first bite of buttery, fluffy warm challah. It really is a moment of pure delight and half that challah was gone before we knew it. Everyone brought a challah home and they took my advice and made french toast out of it. So, we all had a ridiculous amount of fun, learned how to make bread and bonded over a shared experience. I ask you, what better way is there to spend a cold, winter day? We will be Bitchin in the Kitchen again next month, this time at Suzanne's house to learn how to make pierogies. I can't wait!!